Hot Deformation: Overview
Metal Forming at the Center of Excellence for the Synthesis and Processing of Advanced Materials
D.A. Hughes, M.E. Kassner, M.G. Stout, and J.S. Vetrano
 |
| CONTENTS |
|---|
|
The U.S. Department of Energy's Office of Basic Energy Sciences recently established the Center for Excellence in the Synthesis and Processing of Advanced Materials. Projects at the center typically include several national laboratories, industrial partners, and universities; metal forming is one of eight projects within the center. This article describes the center's metal forming project, which emphasizes aluminum alloy forming, particularly as applicable to the automotive industry.
Metal-forming operations are among the most common materials processing steps in industry, both for the production of semifinished products as well as for the manufacturing of consumer goods and military hardware. The expenditure of capital investment in plant and operating equipment for the production of goods is enormous. Since these operations occur within a high-volume industry, even small improvements in materials properties, simulations, and manufacturing costs will translate into substantial savings. Additionally, major technological changes are on the horizon that require significant advances be made in the science and technology of metal forming. These changes will occur concurrently in basic materials science and technology and the engineering science of forming operations.
One of these major changes is the reduction in weight for the next generation of automobiles. In order to achieve increased efficiency, the clean cars of the future must be built with lightweight materials, such as aluminum. Aluminum alloys have been considered in the past for automotive applications, in particular for body panels. However, in comparison to steels, aluminum sheet metal is more expensive and less formable. The formability of the aluminum is directly related to its work hardening rate and level of anisotropy in its mechanical properties. These material properties depend on the alloying content, preferred crystallographic texture, retained deformation microstructure, and/or recrystallization microstructure following processing. Thus, scientific advances in the prediction and control of microstructures and textures during thermo-mechanical processing of common aluminum alloys is the preferred route to obtain formability at low cost.
For these reasons, metal forming was chosen as the focus of one of eight multi-laboratory projects within the Center of Excellence for the Synthesis and Processing of Advanced Materials, established by the U.S. Department of Energy's (DOE's) Office of Basic Energy Sciences, Division of Materials Sciences, and the DOE laboratories (see Reference 1 for more information on the center). The objective of the metal forming project is to develop a scientific understanding of the phenomena related to the forming of aluminum alloys for industrial (especially automotive) applications. This objective also overlaps with programmatic needs within the DOE complex for forged stainless steel components with controlled microstructures.
Examples of recent research results from three main areas of the metal forming project are discussed in this article. These areas, though addressing diverse problems, have a common thread in the development of an understanding of precursor microstructures and crystallographic textures to control the final recrystallization microstructure, texture, and materials properties.
The first area is the development of the processing and microstructural attributes required to produce grain refinement and superplastic behavior in Al-Mg-Mn-Sc alloys. The scope of this task includes the role of different types of particles in recrystallization as well as the development of thermomechanical treatments to produce fine grain sizes. These Al-Mg-Mn-Sc alloys are modifications of a commercial 5083 alloy and are under development for low-cost, high-volume automotive parts. Researchers in this area include J. Vetrano and S.M. Breummer, Pacific Northwest Laboratory; L.M. Pawloski and I.M. Robertson, Materials Research Laboratory, Urbana-Champaign; and T.G. Nieh, Lawrence Livermore National Laboratory.
The second research area is the determination of mechanisms and parameters for the evolution of deformation microstructures that quantitatively represent the microstructure. These parameters will link the microstructure to the deformation and any subsequent recrystallization. The ultimate goal is to develop a theory of dislocation microstructural evolution. The researchers include D.A. Hughes and A. Godfrey, Sandia National Laboratories, California; D.C. Chrzan, Lawrence Berkeley Laboratory; N. Hansen and Q. Liu, Risø National Laboratory, Denmark; and E.A. Holm, Sandia National Laboratories, New Mexico.
The last area discussed here is the development of material constitutive laws for the hot deformation of a commercial Al-Mg-Mn alloy 5182. This development includes the prediction of texture, mechanical properties, and microstructure based on experiment, models, and simulations. Researchers that are working on this project include M.G. Stout, Los Alamos National Laboratory; R.B. Thompson, Ames Laboratory; A. Schwartz, Lawrence Livermore National Laboratory; B. Radhakrishnan and G. Sarma, Oak Ridge National Laboratory; and S.R. MacEwen, Alcan International.
The scope of these topic areas requires a great diversity of expertise. There are very few laboratories or universities that house the complete collection of skills and equipment necessary for such a project, and if one did, the expertise would not be world class in each topical area. By combining the efforts of the DOE national laboratories and private industry, it is possible to assemble these scientists.
 |
| a |
 |
| b |
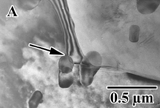
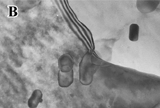
| Figure 1. In-situ recrystallization of an Al-Mg-Mn alloy showing pinning of the grain boundary by Al6Mn particles. (a) As the boundary moves from left to right it is first pinned by the arrowed particle and (b) then overcomes the pinning force. |
Superplasticity, the process by which materials can be made to undergo extremely high plastic deformation at high temperature, generally requires that the material have a fine grain size. Often the processing required to achieve fine grains is too expensive for high-volume applications such as in the automotive industry. This research seeks to manipulate the recrystallized microstructure in a relatively low-cost Al-4Mg-1Mn-0.5Sc alloy (similar to the commercial alloy 5083 except for the scandium addition) by forming a better understanding of the role of particles in the recrystallization process.2,3 This information will be used to optimize thermomechanical processing and create a fine-grained, superplastic material using industrially relevant techniques.
In-situ heating studies in a transmission electron microscope (TEM) of an Al-4Mg-1Mn alloy revealed that the recrystallization nuclei in these alloys formed primarily adjacent to micrometer-sized particles that are produced during casting. Following nucleation, smaller particles can restrict subsequent grain boundary movement and promote a fine-grained microstructure through Zener drag.4 This can be seen in the time sequence micrographs of Figure 1, which show a curved grain boundary that is pinned by a small cluster of Al6Mn particles (Figure 1a) and the movement of the boundary as it overcomes the pinning force as a result of a local increase in the driving force due to changes in boundary curvature and thermal activation (Figure 1b).
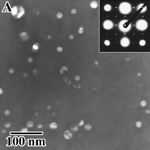
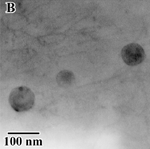
Scandium additions create submicrometer Al3Sc particles that can be manipulated by heat treatments to form very fine particles that are coherent with the matrix (Figure 2a) or slightly larger particles that are incoherent (Figure 2b). Coherent particles exert twice the pinning force as incoherent particles, and the Zener pressure from a distribution of particles scales inversely with the particle radius.5 In-situ and bulk recrystallization studies have confirmed that when the Al3Sc precipitates are coherent they strongly pin the recovered dislocation substructure and restrict the recrystallization process; when they are larger they effectively inhibit grain boundary migration and slow grain growth.
By understanding the role of particles on the recrystallization process in these alloys, thermomechanical processing can be designed to tailor particle size and coherency and manipulate the final grain structure. A low-temperature homogenization heat treatment at 300°C for 50 h formed coherent Al3Sc particles. The cold-rolled material with coherent particles was very resistant to complete recrystallization even at temperatures near the melting point, indicating that nucleation was limited by particles pinning the recovered dislocation substructure. Following heat treatment, the micro-structure consisted primarily of sub-grains (100 nm in diameter) that were separated by low-angle boundaries with a few large, recrystallized grains. The superplastic response for material in this partly recrystallized condition was poor.
 |
 |
| a |
b |
| Figure 2. TEM images of Al3Sc particles following (a) a 300°C/50 h heat treatment and (b) 500°C/2 h heat treatment. The dark field image in (a) is taken using one of the superlattice spots shown in the inset diffraction pattern and reveals that the precipitates (bright) are very small and coherent with the matrix. The precipitates that are shown in (b), on the other hand, are larger, fewer in number, and incoherent. |
To create incoherent (overaged) Al3Sc particles, a 500°C/2 h heat treatment was utilized. By a simple cold rolling and recrystallization process used in the commercial aluminum industry, a grain size of 4.4 µm was obtained for this heat treatment. This microstructure was achieved by optimizing the balance between grain nucleation and growth. The generation of this homogeneous fine-grained structure resulted in a material that was highly superplastic at 550°C, deforming up to 600% at a moderate strain rate of 1 x 10⁻⁴ s-1 and more than 300% at the high strain rate of 1 x 10⁻² s-1. In contrast, the maximum elongation achieved in commercial 5083 with a similar composition is about half that value, even at slow strain rates.
Large strain deformations take place in many metal forming processes such as sheet forming, forging, extrusion, and sheet rolling. In all these cases, plastic deformation creates a subdivision of the initial grains into smaller crystallites separated by dislocation boundaries and gives rise to a preferred texture. While dislocation cell formation and grain refinement have been described qualitatively, a further step is to quantify structural parameters that integrate the microstructure into constitutive laws. Both the common pattern of grain subdivision and the discovery of the scaling relationships that are described below indicate that general relationships exist that control the evolution of the dislocation structure as a function of the plastic deformation.
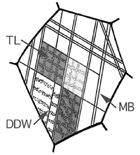
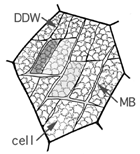
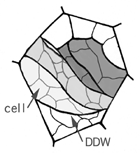
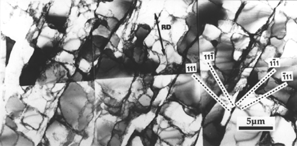
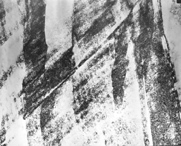
TEM observations of the dislocation structures following deformation in a number of face-centered cubic (f.c.c.) metals and alloys, including those of aluminum, reveal a common microstructural pattern of grain subdivision by dislocation boundaries at two (and sometimes three) size scales.6 Grain subdivision as a function of different temperatures and alloying content is shown schematically in Figure 3. Examples of grain subdivision in cold-rolled pure aluminum7 and warm-rolled aluminum with 5 wt.% magnesium are shown in the TEM micrographs illustrated in Figure 4.
 |
 |
 |
| a |
b |
c |
| Figure 3. A schematic of deformation microstructures showing grain subdivision occurring in deformed f.c.c. metals and alloys as a function of temperature, strain rate, alloy content, and stacking fault energy. The dislocation boundary types are labeled in the drawings according to GNBs (DDWs and MBs); IDBs (cells); and Taylor lattices (cell blocks and Taylor lattices are shaded). (a) The grain subdivision in alloys or pure metals with a low stacking fault energy or large friction stress at low to intermediate temperatures. Pure metals with medium to high stacking fault energy deformed at extremely low temperatures and high strain rates. (b) Grain subdivision in pure metals and some alloys with medium to high stacking fault energy deformed at low to intermediate temperatures and alloys deformed at intermediate to high temperatures. (c) Grain subdivision in pure metals and some alloys deformed at high temperatures. |
 |
 |
| a |
b |
| Figure 4. (a) Dislocation microstructure developed in ten percent cold-rolled pure aluminum showing a cell block structure. Rolling direction is marked RD and the dashed lines are traces of {111} planes.7 (b) Dislocation microstructure developed in 30% warm-rolled Al + 5%Mg showing a Taylor lattice block structure. |
In general, two different types of dislocation boundaries are observed: long, continuous dislocation boundaries that are called geometrically necessary boundaries (GNBs) and smaller scale cell boundaries termed incidental dislocation boundaries (IDBs).6,8 The nearly planar GNBs enclose blocks of many approximately equiaxed cells to form a cell block (CB) structure. At small to intermediate strains, these GNBs are termed dense dislocation walls (DDWs) and micro-bands (MBs), depending on whether the boundaries appear singly or in pairs. Note that these nearly planar boundaries are arranged in groups that are approximately parallel to the macroscopic planes containing the direction of the maximum shear stress. This pattern of grain subdivision is well established for aluminum that is deformed at room temperature.
In some cold-to-warm deformed alloys, like Al-Mg and Al-Mg-Mn, dislocation cell formation is inhibited, and the grain subdivision is modified.9-12 For these alloys, instead of a cell structure with the dislocations in nearly two-dimensional walls surrounding almost dislocation-free regions, dislocations are arranged in more uniform space-filling arrays called Taylor lattices (TL),12,13 as shown in Figure 3a and 4b. Grain subdivision then consists of planar GNBs surrounding a TL block instead of a CB. As the temperature and strain rate are increased to those consistent with hot working conditions, CB structures are formed in the alloys,14,15 and the pattern of grain subdivision at two size scales continues to persist (Figure 3c). However, because of the large spacing of dislocation boundaries at these higher temperatures, there may be only a few GNBs across a grain depending on alloy content and temperature. These widely spaced GNBs are only visible in transmission electron microscopy thin foils and micrographs covering very large areas of 400-10,000 µm.2
While grain subdivision is very general for many materials and conditions, the presence of particles and precipitates in an alloy may change this scenario depending on particle size and distribution. An example is aluminum containing particles of a small size (i.e., 10 nm x 50-100 nm) that strongly interact with the development of the dislocation structure (see Reference 16). The small particles promote more equiaxed structures at the expense of long, continuous GNBs.
The distinction between the types of boundaries, GNB or IDB, is based not only on the morphological differences described, but also importantly on differences in the mechanisms for the formation and evolution of the boundaries that lead to their different microscopic characteristics. For IDBs and TLs, the underlying mechanism is suggested to be the statistical trapping of glide dislocations, whereas the formation of GNBs is related to differences in the slip systems operating in neighboring CBs or to the operation of similar slip systems with different shear amplitudes. A misorientation angle develops across the GNBs that accommodates the lattice mismatch due to these slip differences. As a result, the average misorientation angle across the GNBs increases more rapidly with increasing strain than the average angle across the IDBs.
This increase in average angle can be described empirically by a power law relationship between the angle and the strain. For example, the average angle varies approximately as the square root of the strain for IDBs and as a two-thirds power for the GNBs for cold-rolled aluminum.17 The spacing between GNBs also decreases more rapidly with increasing strain than the cell spacings. The average boundary spacing has long been known to be inversely related to the flow stress. Since both the boundary spacings and misorientation angles are affected in a regular way by the applied stress and strain, they are the material parameters of choice that quantitatively reflect this evolving grain subdivision.
To measure the parameters that describe the dislocation structure developing during deformation, samples are deformed under different conditions to different strain levels. The dislocation structure is then observed in the TEM. Dislocation boundary type is assigned, and spacings and misorientation angles across the boundaries are measured to obtain both the average value and the distributions of these parameters. The misorientation or relative difference in orientation between two crystalline regions is described by specifying both the minimum angle needed to rotate one crystal lattice into coincidence with the other as determined by considering all possible rotations based on crystal symmetry and the axis about which this rotation is made. To calculate the misorientation angle/axis pair, the orientation of each crystal region must first be measured with respect to a reference frame. These measurements are made in adjacent crystallites using a semiautomatic technique to measure Kikuchi diffraction patterns in a TEM.18 The principles of this technique are similar to the automatic techniques developed for the scanning electron microscope (SEM), in which electron backscattered patterns are measured. These highly automated SEM techniques are often referred to as electron backscattered patterns or orientation imaging microscopy (OIM).19,20 In the SEM, however, the measurements are made blind without reference to the underlying dislocation structure, while in the TEM, the measurements are made with respect to the visible dislocation structure and dislocation boundary type.
At each strain level and for each boundary type, an average angle,  av, is calculated from the experimental data, and the misorientation data are binned to create histograms. Probability densities are calculated from the binned data such that P(
 ,
, av) d
av) d is defined to be the probability that any given boundary has a misorientation angle between
  and
and  + d
+ d , given that the average misorientation angle in the distribution is
  av.
av.
The widely varied probability densities of misorientation angles P( ,
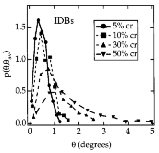
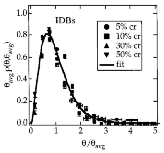
,  av) are shown in Figure 5a for the IDBs. Although each distribution is very different, it was discovered that they can all be scaled into a single distribution according to17
P( ,
,
 av) =
av) =
 -1avf(
 /
/
 av)
av)
 |
 |
| a |
b |
| Figure 5. (a) Probability densities of the IDB boundary misorientation angles in cold-rolled aluminum.17 (b) Misorientation angle probability densities scale into one distribution using the average angle.17 |
The data collapse exhibited by the scaled misorientation distributions is shown in Figure 5b. An analogous approach can be made for the distributions of boundary spacings. For the boundary spacings, D and Dav replace  and
and  av in the above equation. Remarkably, it is observed that the same scaling function f(x) applies to both the angle and the spacings.21 Note that the boundary spacings are inversely related to the flow stress. As a further connection between the two parameters, Dav
 av is a constant for a given material over the range in which both parameters scale. While the scaling applies to all of the IDB distributions (Figure 5b), the scaled GNB mis-orientation distributions show a somewhat larger data scatter. These deviations may be caused by additional factors controlling the GNB misorientation distribution, especially at larger strains (see Reference 17). The existence of the scaling relationships for the misorientations and spacings indicates that the deformation structure and its evolution are governed by relatively simple laws for the collective properties of dislocation microstructures produced by plastic deformation. These laws can be integrated into material constitutive laws.
Aluminum alloy 5182 has potential applications as an auto body material for the production of lighter and, hence, more fuel-efficient vehicles. This application is in addition to its current widespread use as a packaging material for can ends. The processing of 5182, which includes extensive hot-rolling and cold-rolling steps, has significant scientific and technological importance. Ingots of 5182 are hot rolled in several steps to break down the ingot into an approximately 25 mm thick plate called transfer gauge. The transfer gauge is then cold rolled to produce the final sheet used to form automobile body panels. Very large material changes occur during this processing, including changes in work hardening, flow stress, mechanical anisotropy, texture, and microstructure. What is needed is both a physical understanding of the material changes occurring during the process of hot deformation and models that can be used to simulate the process.
To attack these problems, a wide range of approaches are being combined, including mechanical properties experiments, texture measurement, microstructural characterization, and modeling. A series of compression experiments were done to characterize the constitutive behavior of 5182 as a function of temperature and strain rate. This constitutive response is being correlated to the initial texture of the aluminum as well as to the deformation textures and microstructures that develop. Several techniques are being used to evaluate textures, including x-ray analysis and ultrasonic wave analysis. The ultrasonic analysis is under development for industrial process control, since it can be performed in real time and at an elevated temperature. Microstructure and local orientations are being examined by OIM and TEM. Two types of modeling are being pursued: constitutive modeling of the metals flow behavior and Monté Carlo simulations that describe recrystallization processes.
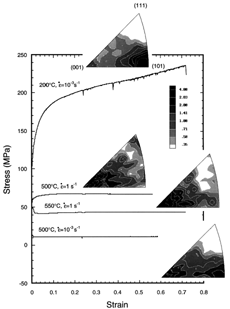
Aluminum alloy 5182 samples were compressed to about 60% strain at a number of temperatures between 22°C and 550°C and strain rates of 10-3 s-1 and 1 s-1. Samples were quenched following testing. The effectiveness of this quench in preserving the deformation structure and texture was explored by using embedded thermocouples, reloading tests, and temperature hold tests prior to quenching. These tests indicated that the changes to the texture and microstructure during the quench were minimal. The constitutive, stress-strain behavior of the 5182 aluminum was measured during the experiments, and representative data are plotted in Figures 6 and 7; note in these graphs the very large range of yield and flow stresses and the differing work-hardening rates for the conditions tested. The types of stress-strain response are indicative of the operation of different types of deformation mechanisms.
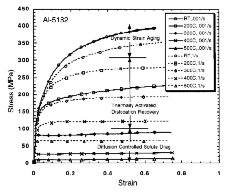 |
| Figure 6. The mechanical constitutive behavior of 5182 aluminum at different temperatures and strain rates.
|
Based on the yield and flow stress relationships obtained from the different experimental conditions, three different physical mechanisms account for the metals deformation (Figure 6). At room temperature (22°C) and slightly above, deformation is characterized by dynamic strain aging.22,23 Thermally activated dynamic recovery24 dominates the deformation mechanism at moderate temperatures, while diffusion-controlled solute drag25 governs at high temperatures. The strain-rate sensitivity, m = 0.3, is high in the high-temperature solute drag region compared to that at room temperature, m = -0.003 (see also Reference 24). Comprehensive constitutive models are under development to capture this wide range of mechanical behavior. One contribution to the behavior is evolving texture.
The texture affects the formability of the sheet; certain combinations of textures, like the cube and deformation texture, are desirable to the producer. Thus, it is important to understand what combination of mechanisms (e.g., slip processes or recrystallization) gives rise to the observed texture evolution. The textures of the specimens both prior to and following deformation were measured with x-ray diffraction, and the orientation distribution functions were calculated. These textures are represented in inverse pole figures in which the crystal directions of the compression axis are plotted in a standard stereographic triangle. The starting texture of the samples prior to deformation consisted of a medium strength (001) cube texture typical of recrystallized samples.
Following deformation, the texture that developed depended on temperature and strain rate as shown in Figure 7. Specimens deformed at low to intermediate temperatures (22-200°C) develop a classical compression deformation texture26 consisting of a (101) fiber along the compression axis that completely replaces the (001) starting texture. Deformation at higher temperatures and low strain rates (400°C,  = 10-3 s-1 and 500°C and
  = 10-3 s-1) produces a two-component texture combining the (001) cube and (101) deformation components (Figure 7). At 500°C with a higher strain rate (
 = 1 s-1), only the (001) cube component is observed. Diffusion-controlled solute drag is the operative deformation mechanism for the cases where the (001) cube texture component was observed after deformation.
 |
| Figure 7. Inverse pole figures and stress-strain curves of the compression deformation textures that developed in 5182 aluminum at different strain rates and temperatures. |
A specimen that was compressed to 60% strain at 550°C and a strain rate of 10-3 s-1 was analyzed by OIM to see whether grains in the (001) cube orientation were associated with recrystallization or deformation. Grain location, size, and aspect ratio will differ between the recrystallized and deformed grains when the specimen is viewed in a section that is parallel to a plane containing the compression axis.
The OIM observations showed distinctly more grains with either a (001) and (101) plane normal parallel to the compression axis compared to randomly oriented grains, which is consistent with the x-ray texture measurements. No obvious spatial relationship, like a necklace arrangement of small dynamically recrystallized grains around a larger grain, is observed between grains of particular orientations; rather, the distribution appears to be fairly random. The measured size and shapes of the grains are also similar regardless of their specific orientation. Grains with both the (101) or (001) orientation had, on average, an oblong shape consistent with the geometric shape change for 60% compression. The oblong shape differs from the equiaxed shape expected of recrystallized grains. To further distinguish the deformation/recrystallization character of the microstructure, detailed transmission electron microscopy of the dislocation substructures and optical and OIM techniques27 used for distinguishing the recrystallization nuclei are needed.
The textures measured following high-temperature compression, using independent techniques, each show a (100) cube component in the final deformation texture. This texture is very different than the classical (101) fiber deformation texture measured following compression at room temperature and 200°C. A (100) cube component is frequently associated with recrystallization rather than with deformation by compression. However, a few observations associate the cube orientation with deformation. For example, the (100) orientation is maintained in (100) single crystals of aluminum and Al-Mn during high-temperature channel die compression.28,29 In the current case, the amount of (100) cube component observed following high-temperature compression is similar to or less than the amount in the initial texture. These observations suggest two main possibilities for the texture changes with temperature: that static and/or dynamic recrystallization has occurred, creating a cube texture, or that the cube component is stable at high temperature, and thus, the (001) type grains do not rotate far from their initial texture during deformation.
In light of the interrupted mechanical-deformation experiments and the OIM results, it does not appear that significant static or dynamic recrystallization is occurring. Under the current deformation conditions and strain levels, a negligible amount of static and/or dynamic recrystallization is consistent with other results published in the literature.25,30,31
To explore whether a (001) texture can be formed by slip processes instead of recrystallization, polycrystal-plasticity simulations were performed for compression using a Taylor model. Normally in a Taylor model under compressive loading with slip on the <110>{111} systems, all orientations, including (001), rotate to (101). Thus, to predict or stabilize the (001) orientation within a Taylor model, different constraint levels, climb mechanisms, and slip-system combinations, including octahedral {111} and nonoctahedral {100} and {110} slip planes, were assumed. A (001) component could only be predicted with the Taylor model using the {100} and {110} slip plane assumption without conventional octahedral {111} slip. While there are reports in the literature of nonoctahedral slip occurring on {110} in hot-deformed aluminum,28,29 completely eliminating all {111} slip is not a satisfactory answer. Other types of polycrystal models are being explored in an effort to predict the (001) and combined (001) and (101) textures.
An ultrasonic nondestructive evaluation technique that can potentially be applied in the field is being refined for accurately characterizing the texture in aluminum alloys.32-34 The advantage of the ultrasonic analysis is that it can be performed in real time at an elevated temperature and, thus, can be coupled with constitutive and process models for real-time process control. This technique uses sums and differences in elastic wave velocities to determine orientation coefficients expressed as Wlmn from a harmonic analysis of the material's texture. Because it uses sums and differences, this technique is insensitive to material alloying content, which alters the absolute-wave velocities. Results of this analysis for W400, W420, and W440 measured on 5182 alloy have been compared to those from x-ray diffraction. The agreement between the two techniques is excellent.
During the hot-rolling process it is necessary to control recrystallization both during the deformation and during any intermediate annealing steps. Thus, recrystallization models are needed. The model of choice for the 5182 alloy couples a finite-element calculation of microstructural deformation based on crystal plasticity with a Monté Carlo simulation of recrystallization.35,36 The finite-element analysis involves an explicit discretization of grains at the microstructural level. From the finite-element simulation, grain shape changes, orientations, and stored energy are calculated. These results are mapped onto a three-dimensional Monté Carlo grid. This model coupling implicitly incorporates the stored energy, nucleation parameter, and recrystallization criterion into the Monté Carlo calculation.35,36 As recrystallization proceeds in the model, nonrandom impingement of grains and the formation of islands of unrecrystallized material occurs because of loss of growth dimensionality and driving force due to recovery and nonuniform stored energy. The model keeps track of the grain orientations and shapes during the whole process so that texture changes can be predicted. Results of testing conducted to date provide realistic recrystallization textures.
The authors are grateful for W. Wolfer's contributions in organizing this metal forming collaboration. This work was supported in part by the U.S. Department of Energy, Office of Basic Energy Sciences, Division of Materials Sciences under contract numbers W-7405-eng-36, DE-AC04-94AL85000, DE-FG03-97ER45643, and DE-AC06-76RLO 1830.
1. G.A. Samara, The DOE Center of Excellence for the Synthesis and Processing of Advanced Materials (SAND97-1931, Sandia National Laboratories, 1997).
2. J.S. Vetrano et al., "Influence of the Particle Size on Recrystallization and Grain Growth in Al-Mg-X Alloys," Mater. Sci. and Eng. A, 238 (1997), pp. 101-107.
3. J.S. Vetrano et al., "Use of Sc, Zr and Mn for Grain Size Control in Al-Mg Alloys," Superplasticity and Superplastic Forming 1998, eds. A.K. Ghosh and T.R. Bieler (Warrendale, PA: TMS, 1998), pp. 89-98.
4. C.S. Smith, Trans. Metall. Soc. A.I.M.E., 175 (1948), p. 15.
5. E. Nes, N. Ryum, and O. Hunderi, "On Zener Drag," Acta Metall., 33 (1985), p. 11.
6. B. Bay et al., "Evolution of fcc Deformation Structures in Polyslip," Acta Met. Mater., 40 (1992), pp. 205-219.
7. Q. Liu and N. Hansen, "Geometrically Necessary Boundaries and Incidental Dislocation Boundaries Formed during Cold Deformation," Scripta Metall. Mater., 32 (1995), p. 1289.
8. D. Kuhlmann-Wilsdorf and N. Hansen, "Geometrically Necessary, Incidental and Subgrain Boundaries," Scripta Metall. Mater., 25 (1991), pp. 1557-1562.
9. Y.L. Liu et al., "Substructure Development and Mechanical Properties in Cold-Rolled Aluminum Alloy 3004," Mater. Sci. Engr., 96 (1987), pp. 125-137.
10. Y. Nakayama and K. Morii, "Microstructure and Shear Band Formation in Rolled Single Crystals of Al-Mg Alloy," Acta Metall., 35 (1987), pp. 1747-1755.
11. N. Raghunathan and T. Sheppard, "Evolution of Structure in Roll Gap When Rolling Aluminum Alloys," Mater. Sci. Tech., 5 (1989), pp. 194-201.
12. D.A. Hughes, "Microstructural Evolution in a Non-Cell Forming Metal: Al-Mg," Acta Metall. Mater., 41 (1993), pp. 1421-1430.
13. D. Kuhlmann-Wilsdorf, "Theory of Plastic Deformation: Properties of Low Energy Dislocation Structures," Mater. Sci. Eng., A113 (1989), pp. 1-41.
14. M.A. Zaidi and T. Sheppard, "Development of Microstructure throughout Roll Gap During Rolling of Aluminum Alloys," Metal Sci., 16 (1982), pp. 229-238.
15. D. Duly et al., "Microstructure and Local Crystallographic Evolution in an Al-1wt%Mg Alloy Deformed at Intermediate Temperature and High Strain-Rate," Acta Mater., 44 (1996), pp. 2947-2962.
16. C.Y. Barlow and N. Hansen, "Deformation Structures in Aluminum Containing Small Particles," Acta. Metall., 37 (1989), pp. 1313-1320.
17. D.A. Hughes et al., "Scaling of Microstructural Parameters: Misorientations of Deformation Induced Boundaries," Acta Mater., 45 (1997), pp. 105-112.
18. Q. Liu, "A Simple Method for Determining Orientation and Misorientation of the Cubic Crystal Specimen," J. Appl. Cryst., 27 (1994), pp. 755-761.
19. B.L. Adams, S.I. Wright, and K. Kunze, "Orientation Imaging: The Emergence of a New Microscopy," Metall. Trans. A 24A (1993), pp. 819-831.
20. N.C. Krieger Lassen and D. Juul Jensen, Mater. Sci. Forum, 113-115 (1993), pp. 679-684.
21. A. Godfrey and D.A. Hughes, "Characterization of Dislocation Wall Spacing Distributions," Solidification 1998, ed. S.P. Marsh et al. (Warrendale, PA: TMS, 1998).
22. S.R. MacEwen and B. Ramaswami, "Dynamic Strain Aging and Jerky Flow in Al-Mg Single Crystals," Phil. Mag., 22 (1970), 1025-1037.
23. D.J. Lloyd and D. Kenny, "The Large Strain Deformation of Some Aluminum Alloys," Metall. Trans. A, 13A (1982), pp. 1445-1452.
24. R.A. Ayres, "Alloying Aluminum with Magnesium for Ductility at Warm Temperatures (25 to 250°C)," Metall. Trans. A, 10A (1979), pp. 849-854.
25. G.A. Henshall, M.E. Kassner, and H.J. McQueen, "Dynamic Restoration Mechanisms in Al-5.8 At. Pct Mg Deformed to Large Strains in the Solute Drag Regime," Metall. Trans. A, 23A (1992), 881-889.
26. M.G. Stout et al., "Material Dependence of Deformation Texture Development in Various Deformation Modes," Eighth International Conference on Textures of Materials,
ed. J.S. Kallend and G. Gottstein (Warrendale, PA: TMS, 1988), pp. 479-484.
27. D. Juul Jensen, "Growth Rates and Misorientation Relationships between Growing Nuclei/Grains and the Surrounding Deformed Matrix during Recrystallization," Acta. Metall. Mater., 43 (1995), pp. 4117-4129.
28. C. Maurice and J.H. Driver, "High Temperature Plane Strain Compression of Cube Oriented Aluminum Crystals," Acta Metall. Mater., 41 (1993), pp. 1653-1664.
29. C. Maurice, M.-C. Theyssier, and J.H. Driver, "Which Slip Systems in Hot-Rolled Aluminum?" Advances in Hot Deformation Textures and Microstructures, eds. J.J. Jonas, T.R. Bieler, and K. Bowman (Warrendale, PA: TMS, 1994), pp. 411-425.
30. H.J. McQueen, "Initiating Nucleation of Dynamic Recrystallization, Primarily in Polycrystals," Mater. Sci. Engr., 101 (1988), pp. 149-160.
31. H.J. McQueen, "Hot, Warm and Cold Working of Al Alloys: Recrystallization During or After," Proceedings of ReX'96, the Third International Conference on Recrystallization and Related Phenomena, ed. T.R. McNelley (Monterey, CA: Monterey Instit. of Advanced Studies, 1997), pp. 123-136.
32. A. Anderson et al., "Ultrasonic Characterization of Rolling and Recrystallization Textures in Hot Rolled Aluminum Sheet," Textures and Microstructures, 26-27 (1996), pp. 39-38.
33. G. Liu, O. Buck, and R.B. Thompson, "Ultrasonic Monitoring of Recrystallization Texture in Aluminum," Review of Progress in Quantitative Nondestructive Evaluation, ed. D.O. Thompson and D.E. Chimenti (New York: Plenum Press, 1998).
34. R.B. Thompson,"Ultrasonic Determination of Texture and Grain Size in Metal: An Example of Materials Characterization," Sensing for Materials Characterization, eds. G. Birnbaum and B.A. Auld (Columbus, OH: ASNT, 1998).
35. B. Radhakrishnan, G.B. Sarma, and T. Zacharia, "Modeling the Kinetics and Microstructural Evolution During Static Recrystallization," Acta. Mater., in press.
36. G.B. Sarma, B. Radhakrishnan, and T. Zacharia, "Finite Element Simulations of Cold Deformation at the Mesoscale," submitted for publication.
ABOUT THE AUTHORS
D.A. Hughes earned her Ph.D. in materials science at Stanford University in 1986. She is a principal member of the technical staff at Sandia National Laboratories.
M.E. Kassner earned his Ph.D. in materials science at Stanford University in 1981. He is Northwest Aluminum Professor at Oregon State University.
M.G. Stout earned his Ph.D. in materials science at the University of Minnesota in 1976. He is a staff member at Los Alamos National Laboratory.
J. Vetrano earned his Ph.D. in metallurgy at the University of Illinois in 1990. He is a senior research scientist at Pacific Northwest National Laboratory.
For more information, contact D.A. Hughes, Center for Materials and Engineering Sciences, Sandia National Laboratories, P.O. Box 969, MS 9403, Livermore, California 94551-0969; (925) 294-2686; fax (925) 294-3410.
Copyright held by The Minerals, Metals & Materials Society, 1998
Direct questions about this or any other JOM page to jom@tms.org.


 av, is calculated from the experimental data, and the misorientation data are binned to create histograms. Probability densities are calculated from the binned data such that P(
 ,
, av) d
av) d is defined to be the probability that any given boundary has a misorientation angle between
  and
and  + d
+ d , given that the average misorientation angle in the distribution is
  av.
av.
 ,
,  av) are shown in Figure 5a for the IDBs. Although each distribution is very different, it was discovered that they can all be scaled into a single distribution according to17
 ,
,
 av) =
av) =
 -1avf(
 /
/
 av)
av)

 and
and  av in the above equation. Remarkably, it is observed that the same scaling function f(x) applies to both the angle and the spacings.21 Note that the boundary spacings are inversely related to the flow stress. As a further connection between the two parameters, Dav
 av is a constant for a given material over the range in which both parameters scale. While the scaling applies to all of the IDB distributions (Figure 5b), the scaled GNB mis-orientation distributions show a somewhat larger data scatter. These deviations may be caused by additional factors controlling the GNB misorientation distribution, especially at larger strains (see Reference 17). The existence of the scaling relationships for the misorientations and spacings indicates that the deformation structure and its evolution are governed by relatively simple laws for the collective properties of dislocation microstructures produced by plastic deformation. These laws can be integrated into material constitutive laws.

 = 10-3 s-1 and 500°C and
  = 10-3 s-1) produces a two-component texture combining the (001) cube and (101) deformation components (Figure 7). At 500°C with a higher strain rate (
 = 1 s-1), only the (001) cube component is observed. Diffusion-controlled solute drag is the operative deformation mechanism for the cases where the (001) cube texture component was observed after deformation.
