 |
The following article is a component of the November 1998 (vol. 50, no. 11) JOM and is presented as JOM-e. Such articles appear exclusively on the web and do not have print equivalents.
|
Nondestructive Evaluation: Overview
Using Acoustic Emission in Fatigue and Fracture Materials Research
Miinshiou Huang, Liang Jiang, Peter K. Liaw, Charlie R. Brooks, Rodger Seeley, and Dwaine L. Klarstrom
 |
|---|
| CONTENTS |
|---|
|
Acoustic emission is a technique to monitor defect formation and failures in structural materials used in services or laboratories. Moreover, the method has been developed and applied in numerous structural components, such as steam pipes and pressure vessels, and in the research areas of rocks, composite materials, and metals. In this article, the basic concept, terminology, theoretical modeling, and common equipment setup associated with acoustic emission are described. Most of the literature available uses the traditional technique, which only captures acoustic-emission parameters, including acoustic-emission counts, peak levels, and energies. These parameters can be correlated with the defect formation and failures. Some of the researchers analyze the waveforms of acoustic emission as functions of sources and wave-propagation mechanisms. Above all, acoustic emission was found to be an effective way of detecting fatigue and fracture behaviors of materials.
Acoustic emissions (AEs) are the stress waves produced by the sudden internal stress redistribution of the materials caused by the changes in the internal structure. Possible causes of the internal-structure changes are crack initiation and growth, crack opening and closure, dislocation movement, twinning, and phase transformation in monolithic materials and fiber breakage and fiber-matrix debonding in composites.1–55 Most of the sources of AEs are damage-related; thus, the detection and monitoring of these emissions are commonly used to predict material failure.
Besides the applications of AE in research endeavors, AE has been widely used in industries, including for the detection of faults or leakage in pressure vessels, tanks, and piping systems. AE is also used to monitor the welding and corrosion progress.
The difference between the AE technique and other nondestructive evaluation (NDE) methods is that AE detects the activities inside the materials, while other NDE methods attempt to examine the internal structures of the materials. Furthermore, AE only needs the input of one or more relatively small sensors on the surface of the structure or specimen being examined so that the structure or specimen can be subjected to the in-service or laboratory operation while the AE system continuously monitors the progressive damage. Other NDE methods, such as ultrasound and x-ray, have to access the whole structure or specimen, and therefore, the structure or specimen often needs to be disassembled and taken to the laboratory to be examined.
The disadvantage of AE is that commercial AE systems can only estimate qualitatively how much damage is in the material and approximately how long the components will last. So, other NDE methods are still needed to do more thorough examinations and provide quantitative results. Moreover, service environments are generally very noisy, and the AE signals are usually very weak. Thus, signal discrimination and noise reduction are very difficult, yet extremely important for successful AE applications. The research on AE can be generally divided into two categories
- Traditional acoustic emission
- Source-function and waveform analysis
The traditional AE method only captures certain parameters (sometimes called AE features), including AE counts, peak levels, and energies. Then, the AE features are correlated with the defect formation and failures. These AE characteristics are only related to the captured signals and do not account for the source of the signal and wave propagation.
 |
 |
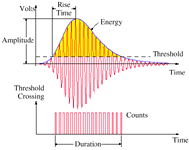
| Figure 1. The definitions for acoustic-emission events. |
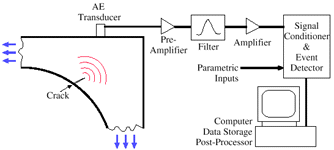
Figure 2. A typical AE system setup. |
Figure 1 shows a burst AE signal and the commonly used parameters of AE techniques. When the AE transducer senses a signal over a certain level (i.e., the threshold), an AE event is captured. The amplitude of the event is defined at the peak of the signal. The number of times the signal rises and crosses the threshold is the count of the AE event. The time period between the rising edge of the first count and the falling edge of the last count is the duration of the AE event. The time period between the rising edge of the first count and the peak of the AE event is called the rise time. The area under the envelope of the AE event is the energy.
Figure 2 presents a typical AE system setup. The AE transducers are generally very sensitive piezoelectric sensors. Because the traditional AE technique only uses AE features, the actual waveforms are not critical to this method. The AE sensors (transducers) used are usually resonance sensors, which are only very sensitive to a certain frequency. Since the AE signals are very weak, a preamplifier is connected right after the AE transducer to minimize the noise interference and prevent the signal loss. Sometimes, the transducer and the preamplifier are built as a unit. Then, the signals pass through a filter to remove the noise. The signals are amplified by the main amplifier before being sent to the signal conditioner. After that, the AE features are subtracted and stored in a computer for further analysis. During investigations, other parameters, such as load, deformation, pressure, and temperature, can also be recorded as parametric inputs.
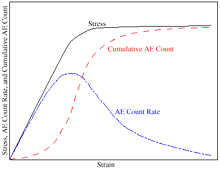 |
| Figure 3. A tensile stress-strain curve and AE signals.15 |
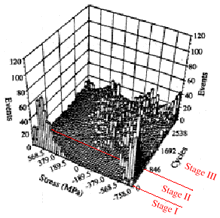 |
| Figure 4. Three-dimensional plots of AE events, cycles, and stresses.7,15 |
 |
| Figure 5. The AE count versus the number of fatigue cycles, where R is the load ratio that is equal to the minimum load over the maximum load during fatigue testing.7,15 |
 |
| Figure 6. Acoustic-emission activities of a smooth-bar fatigue sample of an ULTIMET® superalloy at different fatigue cycles.24 |
Acoustic-emission activities have been shown to relate to different stages of tensile tests of materials.6,14,15 Figure 3 presents the cumulative AE count, AE count rate, and stress versus strain relationship during a tensile test.15 The cumulative AE count is the sum of the count of all AE events. The AE count rate is the time derivative of the AE cumulative count. The beginning portion of the linear elastic region is very quiet (i.e., low count rates and cumulative counts) or is associated with an incubation stage. The AE activity reaches its peak in the second stage right before yielding occurs. After the material yields, the AE activity decreases, but is still detectable until the material fails.
Fatigue tests are usually long-term experiments. A great amount of signals, including the noises from the load-chain, are detected by the sensitive AE sensors during fatigue testing. Therefore, signal screening methods should be used to filter out the unwanted signals. One of the effective methods to screen out noises is to put guard sensors at both ends of the gauge section of the specimen.7,15 According to the time sequence for the guard and main sensors to receive the signals, the signals originating from outside the test section can be detected and discarded.
AE signals during fatigue tests can be caused by various mechanisms, such as dislocation movement, cyclic softening, crack initiation, crack closure, and ultimate failures. Berkovits and Fang7,15 used three-dimensional (3-D) plots of AE events, cycles, and stresses (Figure 4) to discriminate the AE signals due to plastic deformations, crack activities, and closures in a smooth-plate sample of INCOLOY® 901 subjected to fatigue loading. For the beginning cycles of loading, the AE signals in the high-stress region are obviously related to the plastic deformation.
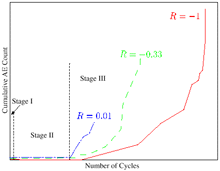
Crack initiation was determined by the first appearance of the AE signal at low stress levels. After the crack initiated, the AE signals around the zero stress were thought to be caused by crack-face grinding when the cracks were closed. By discarding the AE signals due to the crack opening and closure, a plot of the AE count versus the number of fatigue cycles was made of the three damage stages (Figure 5). The first stage corresponds to the first few cycles before the cyclic stress-strain curve stabilized. The AE signals in the first stage result from dislocation movements and cyclic hardening or softening. The second stage, which is the crack-incubation stage, is very quiet. This stage has a steady-state dislocation motion that will eventually result in microvoids and initiate microcracks. The third stage is an AE-active stage. In this stage, cracks start to grow and propagate. Many of the AE signals in the third stage can come from the crack-tip plastic deformation, fracture of hard inclusions, microcrack coalescence, transgranular cleavage, and fracture along grain boundaries.15
Fatigue Crack Initiation
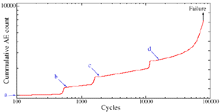
High-sensitivity AE sensors can pick up signals at an early stage of fatigue crack initiation, such as dislocation movement and slip-band formation. A combination of AE and electron microscopy during fatigue testing of carefully polished smooth samples can be a very powerful tool in the study of fatigue crack-initiation behavior. We investigated the surface of polished smooth-bar samples under a scanning electron microscope (SEM) at different stages of fatigue tests when heavy AE activities were observed. Figure 6 shows several jumps on the curve of the cumulative AE count versus cycles.24 The test was conducted on a cobalt-based superalloy, ULTIMET® alloy, from Haynes International. The maximum stress was 644.8 MPa with a ratio of 0.05, where
R =  min/
min/ max
max
 min and
  max are the applied minimum and maximum stresses, respectively. The frequency was 5 Hz initially to study crack-initiation behavior. After 2,000 cycles, the frequency was increased to 25 Hz to shorten the test time.
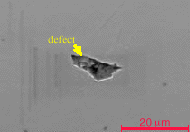
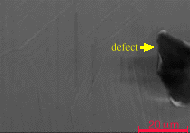
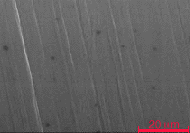
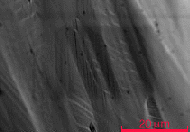
The sample was electropolished before the test started and examined under an SEM. The surface was nearly perfect except for some defects, as shown in Figure 7a. After approximately 600 cycles (Figure 7b), heavy AE activities were observed, the test was stopped, and the specimen was examined. The same procedure was repeated for 2,000 and 16,000 cycles, during which time the specimen was examined following heavy AE activities (Figures 7c and 7d). It was clear that the slip bands grew denser and deeper after each jump of cumulative AE counts. However, how the slip bands evolved between jumps is still not clear. Further investigation is needed to determine whether slip bands suddenly grew when jumps of acoustic activities occurred or grew steadily throughout the fatigue test. The areas near the surface defects were examined carefully, but intensive slip bands around the defects were not found.
 |
 |
| a |
b |
 |
 |
| c |
d |
| Figure 7. Micrographs of the surface of a smooth-bar fatigue sample of an ULTIMET® superalloy (a) prior to testing and at (b) 600 cycles, (c) 2,000 cycles, and (d) 16,000 cycles.24 |
Fatigue Crack Growth
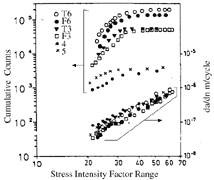
Acoustic emissions also have been used during fatigue crack-propagation tests. All the results from the previous research agree that as the AE count rate increases, the crack-growth rate increases. Nevertheless, how the increase of the AE count rate is related to that of the crack-growth rate varies with different materials.15,26,29–31,38,51 The investigations on INCOLOY® 901,15 aluminum alloys,29,30 and some steels26,51 indicated that a log-log plot of the AE cumulative counts and crack-growth rate versus stress-intensity-factor range was linear. The same linear log-log relationship was also found between the AE count rate and the J-integral range of JIS SS41 steel.31
On the other hand, the log-log plot of the AE cumulative count versus crack-growth rate and stress-intensity-factor range in the AISI 316 stainless steel38 was bilinear within the linear Paris regime (Figure 8). The explanation is that for many steels and aluminum alloys, the linear Paris regime actually can be divided into two sub-regimes in which the fatigue crack-growth mechanisms are different. At lower growth rates, the crack may not grow in each cycle, so the AE count drops very fast in this region.38 In Figure 8, the heat treatments, including aging time, had significant effects on the AE counts, even though the rates of fatigue crack propagation are insensitive to heat treatments. Thus, AE could be used to monitor aging conditions of in-service structural components.
 |
 |
| Figure 8. The AE cumulative count versus crack-growth rate and stress-intensity-factor range in the log-log plot for AISI 316 stainless steel.38 (Note that duplicate samples, T6 and F6, are solution-annealed; T3 and F3 are aged at 1,023 K for 2 h; 4 and 5 are aged at the same temperature for 8 h.) |
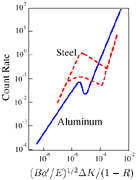
Figure 9. The AE count rate versus (Ba'/E)1/2  K/ (1 – R) in the log-log plot for steel and aluminum alloys.21 K/ (1 – R) in the log-log plot for steel and aluminum alloys.21 |
Note that the relation between the AE count rate versus stress-intensity-factor range is dependent on the R ratio. Harris and Dunegan21 found a way to collapse all the relations at different R ratios into one by plotting the AE count rate versus the function (Ba'/E)1/2  K/(1 – R), where B is the thickness of the specimen, E is the Young’s modulus, a' is the crack-growth rate (a' = da/dN), and
  K is the stress-intensity-factor range. The results for both steel and aluminum alloys are shown in Figure 9. The importance of the parameter, (Ba'/E)1/2
  K/(1 – R), lies in the fact that this parameter equals the square root of the energy released per cycle, which ideally should be directly related to the AE energy, as demonstrated.
Oftentimes, structural materials experience fatigue loading during and after exposure to air, water, or other corrosive environments. Therefore, corrosion failures usually need to be included when investigating fatigue problems. Moreover, corrosion failures also occur under static loading, which must be considered in structural-integrity analyses.
Yuyama55 reviewed the fundamental aspects of AE in corrosion. His article reviews the applications of the AE technique to detecting and monitoring active corrosion, stress corrosion cracking, hydrogen embrittlement, corrosion fatigue, and intergranular stress corrosion cracking in aluminum, aluminum alloys, magnesium alloys, steels, stainless steels, and others (e.g., copper and its alloys, uranium alloys, titanium, and zirconium alloys). Possible sources of AE signals are crack initiation and growth induced by stress corrosion cracking and hydrogen embrittlement; dissolution of metal; hydrogen gas evolution; the breakdown of thick surface-oxide films; the fracture or decohesion of phases, such as precipitates, second-phase particles, and nonmetallic inclusions; twinning deformation in the plastic zone of a crack; slip deformation; and phase transformation. The mechanisms of possible AE sources are illustrated in Figure 10.
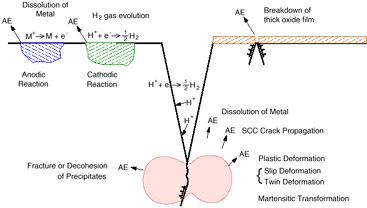 |
| Figure 10. Schematic AE sources during corrosion, stress-corrosion cracking (SCC), and corrosion-fatigue processes.55 |
Because of more complex damage mechanisms, such as reinforcement (fibers or particulates) failures, delamination, matrix cracking, and debonding of the fiber and matrix, composite materials provide a greater variety of AE sources in fatigue and fracture experiments. AE signals resulting from different damage mechanisms often vary significantly. Furthermore, most of the composites consist of at least one hard or brittle phase, which causes stronger AE signals. Because of the great interest in composite materials from industries and academic institutions, there are more publications on AE in composites than other materials.
Hamstad19 reviewed the areas in which AE has been used for composite studies. Pertinent investigations included time-dependent composite properties, correlations of AE with stress levels, applications to matrix-cure studies, relationships of AE-detected damage to other measures of damage, the effects of matrix material, interface studies, AE and dimensional stability, AE applied to orientation studies, and environmental effects.
The reason that traditional AE only uses some of the features of AE signals is because of the limitations of sensors as well as data-capturing and analysis capabilities. In recent years, due to the improvement of transducer technology, wide-band, high-sensitivity sensors have been developed to capture the whole waveform. The rapid advancement of computer technology has made quick data acquisition and analysis of AE waveforms feasible. It is now possible to characterize the nature of AE sources from the waveform captured by the new AE systems.
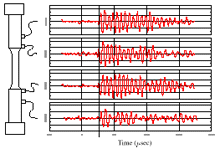 |
| Figure 11. Investigation of the source location of AE signals by the arrival times of several AE sensors in a cylindrical bar of Haynes® HR-120TM.24 |
Research has been conducted on the techniques used to characterize the source of AE by examining the AE signals and using wave propagation for source-function and waveform analyses. The location-filtering technique discriminates the AE from noise signals by using the speed of wave propagation. Figure 11 shows an example of a location-filtering method that employs four AE sensors to identify the sources of the signals in a smooth cylindrical-bar fatigue sample of a nickel-based superalloy, Haynes® HR-120TM.24 The source of the AE signal is located in the gauge-length section only when the two inner sensors pick up the signal earlier than the two outer sensors, as exhibited in Figure 11. If one of the outer sensors picks up a signal first, the signal has likely originated from the hydraulic system, load train, or other noise sources.
Ideally, it is possible to solve inverse wave-propagation problems to identify the source of the AE signals detected using one or more sensors by analyzing the whole waveforms. But it is extremely complex and difficult to solve the inverse problem without any information of the source. Alternately, many researchers have been analytically studying the responses of some known AE sources, such as the elastic wave emitted from a finite mode I through-crack,33 from which the characteristics of AE sources can be identified.
To conduct the source-function and waveform analyses, a fundamental knowledge of wave propagation is essential. The wave propagation in a 3-D elastic body is actually a dynamic problem of elasticity. Without the body force, the governing equation of elasticity can be expressed in terms of the displacement vector field, u, as
 |
(1) |
where  2=
2= 2/
2/ x2+
x2+ 2/
2/ y2+
y2+ 2/
2/ z2, (x, y, z) is the coordinate system,
  is the density of the material, and
  and µ are Lame's constants. According to Helmholtz's theorem,18,40 the vector field, u, can be written as the summation of a gradient of a scalar field,
  , and a curl of a zero-divergence vector field, H
 |
(2) |
Substituting Equation 2 into Equation 1, the wave equations can be obtained as
 |
(3) |
where c1 and c2 are the velocities of the primary and secondary waves, respectively.
With proper formulation of initial and boundary conditions, the AE response of a bulk material can be solved with the above equations. The problem regarding the initiation of mode I, II, or III through-cracks has been formulated.33 For example, the boundary and initiation conditions of a mode I through-crack are
 |
(4) |
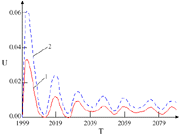 |
Figure 12. Waveforms for finite cracks of normal tear (1) in  = 15° and (2) = 15° and (2)  = 60°, where U and T are the nondimensional amplitude and time, respectively, and = 60°, where U and T are the nondimensional amplitude and time, respectively, and  is the angle from the cracking surface.33 is the angle from the cracking surface.33 |
where H(t) is the Heaviside step function, t is the time, l is the half length of a finite through-crack,  0 is the material-breaking strength, and
  ij are the stress components.
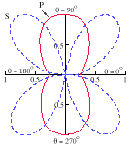
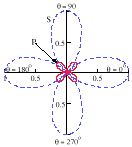
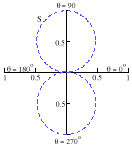
The waveforms of a finite through-crack in two directions calculated using Equations 2–4 are exhibited in Figure 12. The directional dependence of the AE amplitude for mode I, II, or III is presented in Figure 13.
Wave propagation in structural components, such as rods and plates, is more complex than in large bulk materials. Because of the additional boundary conditions, the AE signals detected by the sensors are actually superimposed by multiple reflections of original signals. So far, only simple modes can be roughly distinguished and discussed in the AE research. Figure 14 shows an example of an AE signal of a plate. The signal is actually a combination of the extensional and flexural modes and their reflections.
The most important contribution of AE to industry is that AE can provide early warnings of severe, sudden failures. One mode of such failures can involve fatigue damage. The most dangerous characteristic of fatigue failures is that they usually happen without warning or with very insignificant warnings. AE can detect the accumulation of microdamage inside components, especially under service conditions.
 |
 |
 |
| a |
b |
c |
| Figure 13. The relative amplitudes of primary (P) and secondary (S) waves at different directions/angles with respect to a finite crack of (a) normal tear (Mode I), (b) transverse shear (Mode II), and (c) longitudinal shear (Mode III).33 |
Although AE has been used in materials-related studies for about four decades, there are still many problems. The most important difficulty is associated with the reliability of AE results. Many researchers simply use AE equipment to collect a large amount of data and use the results to explain the material failures qualitatively, without paying too much attention to the sensor calibration and attachment. Sometimes, no distinctions are made between noises and real AE signals. Therefore, it is very difficult to compare results from different papers. This also causes confusion in investigating the reliability of various AE systems.
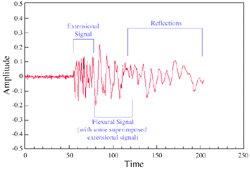 |
| Figure 14. An AE signal of a plate, which is actually a combination of extensional and flexural modes and their reflections.39 |
Applying AE in various environments, especially high-temperature conditions, is also a challenge. The operational temperature ranges of sensors, couplants, wave guides, and other connections need to be considered. Most couplants, such as resin, petroleum grease, and water, can be used only between room temperature and 100°C. High vacuum stop-cock grease and Dow Corning 200 fluid can be employed up to 200°C. A 50% indium-50% gallium mixture can be used up to 700°C. For higher temperature usage, new wave coupling techniques need to be designed.
When comparing AE results in various materials, one finds that there are more publications regarding composites, rocks, and ceramics than metals. The reason for this trend is that the AE signals are stronger and vary more significantly in composites, rocks, and ceramics than in metals. On the other hand, because of the homogeneity and simplicity of metals, the wave propagation in metals should not be as complex as in composites and rocks, since there are less reflections, diffractions, and scattering in metals. Therefore, metals represent a good subject for studying source-function and waveform analyses.
For future developments of source-function and waveform analyses, analytical formulations and closed-form solutions are not possible for complex AE sources and boundary conditions. Numerical techniques, such as finite-element and finite-difference methods, and large-scale computational facilities will be very helpful for forward analyses when the sources of AEs are known by observations and proper assumptions. However, for reverse analyses to identify unknown sources, suitable theories and techniques still need to be developed.
The use of AE will become more prevalent because it can provide unique insights into damage processes. The problems of AE—including noise reduction, reliability, and difficulty in solving the inverse problems of wave propagation in source-function and waveform analyses—represent areas of future endeavor in AE science and technology. There is also a great need for work to develop AE theories for new applications.
This work is supported by the National Science Foundation Division of Design, Manufacture, and Industrial Innovation, under Grant No. DMI-9724476, and the Combined Research-Curriculum Development Program under EEC-9527527 to the University of Tennessee, Knoxville, with Ms. Delcie R. Durham and Ms. Mary Poats as program managers, respectively. We would like to acknowledge the financial support of Haynes International, Inc., and the Center of Materials Processing at University of Tennessee, Knoxville. We are grateful to Mr. Doug Fielden, Mr. Greg Jones, Mr. Ted Long, and Mr. Mark Potter for their great help in setting up the electrohydraulic machines.
1. A. Almeida and E.v.K. Hill, "Neural Network Detection of Fatigue Crack Growth in Reveted Joints Using Acoustic Emission," Mat. Eval., 53 (1) (1995), pp. 76–82.
2. J. Baram, "Fatigue-Life Prediction by an Order Statistics Treatment of Acoustic-Emission Signals," Exper. Mech., 33 (1993), pp. 189–194.
3. B.A. Barna, J.A. Johnson, and R.T. Allemeier, "Determination of Acoustic-Emission Sites Using a Digital Nondestructive-Evaluation Workstation," Exper. Mech., 28 (1988), pp. 210–213.
4. S. Barre and M.L. Benzeggagh, "On the Use of Acoustic Emission to Investigate Damage Mechanisms in Glass-Fibre-Reinforced Polypropylene," Comp. Sci. and Tech., 52 (1994), pp. 369–376.
5. M.N. Bassim, S.S. Lawrence, and C.D. Liu, "Detection of the Onset of Fatigue Crack Growth in Rail Steels Using Acoustic Emission," Eng. Fracture Mech., 47 (2) (1994), pp. 207–214.
6. C. Bathias, "The Use of Experimental Techniques for Description of Fatigue Damage, Subcritical Crack Growth Due to Fatigue, Stress Corrosion and Creep," Lectures from a course held at the Joint Research Center, Ispra, Italy (1984), pp. 85–107.
7. A. Berkovits and D. Fang, "Study of Fatigue Crack Characteristics by Acoustic Emission," Eng. Fracture Mech., 51 (3) (1995), pp. 401–416.
8. J.F. Boudet, S. Ciliberto, and V. Steinberg, "Dynamics of Crack Propagation in Brittle Materials," J. de Physique II, 6 (1996), pp. 1493–1516.
9. G. Caprino and R. Teti, "Quantitative Acoustic Emission for Fracture Behavior of Center-Hole GFRP Laminates," J. Comp. Mat., 28 (13) (1994), pp. 1237–1249.
10. H.L. Chen, C.T. Cheng, and S.E. Chen, "Determination of Fracture Parameters of Mortar and Concrete Beams by Using Acoustic Emission," Mat. Eval., 50 (7) (1992), pp. 888–894.
11. R.B. Clough, J.C. Chang, and J.P. Travis, "Acoustic Emission Signatures and Source Microstructure Using Indentation Fatigue and Stress Corrosion Cracking in Aluminum Alloys," Scripta Met., 15 (1981), pp. 417–422.
12. J.E. Coulter et al., "Acoustic Emission Monitoring of Fossil-Fuel Power Plants," Mat. Eval., 46 (2) (1988), pp. 230–237.
13. P.J. de Groot, P.M. Wijnen, and R.B.F. Janssen, "Real-Time Frequency Determination of Acoustic Emission for Different Fracture Mechanics Carbon/Epoxy Composites," Comp. Sci. and Tech., 55 (1995), pp. 405–412.
14. M. Drissi-Habti and M. Gomina, "Crack Growth Resistance from Natural Crack Lengths in Polycrystalline Alumina," J. Alloys and Compounds, 188 (1992), pp. 259–263.
15. D. Fang and A. Berkovits, "Fatigue Design Model Based on Damage Mechanisms Revealed by Acoustic Emission Measurements," Trans. of ASME, 117 (1995), pp. 200–208.
16. S.D. Glaser, "High-Fidelity Waveform Detection of Acoustic Emissions from Rock Fracture," Mat. Eval., 50 (3) (1992), pp. 354–359.
17. M.R. Gorman and S.M. Ziola, "Plate Waves Produced by Transverse Matrix Cracking," Ultrasonics, 29 (1991), pp. 245–251.
18. K.F. Graff, Wave Motion in Elastic Solids (Columbus, OH: Ohio State University Press, 1975).
19. M.A. Hamstad, "A Review: Acoustic Emission, A Tool for Composite-Materials Studies," Exper. Mech., 26 (1986), pp. 7–13.
20. D.O. Harris and H.L. Dunegan, "Verification of Structural Integrity of Pressure Vessels by Acoustic Emission and Periodic Proof Testing," Testing for Prediction of Material Performance in Structures and Components, ASTM STP 515 (Philadelphia, PA: ASTM, 1972), pp. 158–170.
21. D.O. Harris and H.L. Dunegan, "Continuous Monitoring of Fatigue-Crack Growth by Acoustic-Emission Techniques," Exper. Mech., 14 (February 1974), pp. 71–80.
22. T. Hashida and H. Takahashi, "Significance of AE Crack Monitoring in Fracture Toughness Evaluation and Non-Linear Rock Fracture Mechanics," Int. J. Rock Mech. Min. Sci. & Geomech. Abstr., 30 (1) (1993), pp. 47–60.
23. C.R. Horak and A.F. Weyhreter, "Acoustic Emission System for Monitoring Components and Structures in a Severe Fatigue Noise Environment," Mat. Eval., 35 (1977), pp. 59–68.
24. M. Huang et al., "Study on Acoustic Emission in Fatigue Testing of Haynes Alloy HR-120" (unpublished results).
25. J.G. Bakuckas Jr., W.H. Prosser, and W.S. Johnson, "Monitoring Damage Growth in Titanium Matrix Composites Using Acoustic Emission," J. Comp. Mat., 28 (4) (1994), pp. 305–3281.
26. J.H. Williams Jr., D.M. DeLonga, and S.S. Lee, "Correlations of Acoustic Emission with Fracture Mechanics Parameters in Structural Bridge Steels During Fatigue," Mat. Eval., 40 (10) (1982), pp. 1184–1189.
27. C.J. Kim, G.Z. Lu, and J. Weertman, "Fatigue Crack Advance Presumably Detected by Acoustic Emission Signals," Scripta Met., 17 (1983), pp. 359–364.
28. D.H. Kohn et al., "Methods of Detecting and Predicting Microfracture in Titanium," Medical Applications of Titanium and Its Alloys: The Material and Biological Issues, ASTM STP 1272, eds. S.A. Brown and J.E. Lemons (Philadelphia, PA: ASTM, 1996), pp. 117–135.
29. C.S. Lee, C.G. Park, and Y.W. Chang, "Precise Determination of Fatigue Crack Closure in Al Alloys," Mat. Sci. and Eng., A216 (1996), pp. 131–138.
30. C.S. Lee et al., "Acoustic Emission Measurement of Fatigue Crack Closure," Scripta Metall. Mater., 32 (5) (1995), pp. 701–706.
31. K.Y. Lee, "Cyclic AE Count Rate and Crack Growth Rate under Low Cycle Fatigue Fracture Loading," Eng. Fracture Mech., 34 (5/6) (1989), pp. 1069–1073.
32. M.V. Lysak, "Acoustic Emission during Jumps in Subcritical Growth of Cracks in Three-Dimensional Bodies," Eng. Fracture Mech., 47 (6) (1994), pp. 873–879.
33. M.V. Lysak, "Development of the Theory of Acoustic Emission by Propagating Cracks in Terms of Fracture Mechanics," Eng. Fracture Mech., 55 (3) (1996), pp. 443–452.
34. S. Mashino et al., "Analysis of Microfracture Mechanism of Titanium Alloy by Acoustic Emission Technique," Mat. Sci. and Eng., A213 (1996), pp. 66–70.
35. W.P. Mason, "Internal Friction, Acoustic Emission and Fatigue in Metals for High Amplitude Ultrasonic Frequencies," Eng. Fracture Mech., 8 (1976), pp. 89–101.
36. I.L. Meglis, T.M. Chow, and R.P. Young, "Progressive Microcrack Development in Tests on Lac du Bonnet Granite—I. Acoustic Emission Source Location and Velocity Measurements," Int. J. Rock Mech. Min. Sci. & Geomech. Abstr., 32 (8) (1995), pp. 741–750.
37. J.F. Moore and S. Tsang, "The Early Detection of Fatigue Damage by Exoelectron Emission and Acoustic Emission," Testing for Prediction of Material Performance in Structures and Components, ASTM STP 515 (Philadelphia, PA: ASTM, 1972), pp. 143–157.
38. V. Moorthy, T. Jayakumar, and B. Raj, "Influence of Microstructure on Acoustic Emission Behavior during Stage 2 Fatigue Crack Growth in Solution Annealed, Thermally Aged and Weld Specimens of AISI Type 316 Stainless Steel," Mat. Sci. and Eng., A212 (1996), pp. 273–280.
39. G.N. Morscher, "Modal Acoustic Emission of Damage Accumulation in a Woven SiC/SiC Composite" (to be published).
40. P. Morse and H. Feshbash, Methods of Theoretical Physics, vols. I and II (New York: McGraw-Hill, 1953).
41. A. Niklas et al., "Acoustic Emission during Fatigue Crack Propagation in SiC Particle Reinforced Al Matrix Composites," Met. and Mat. Trans. A, 26A (1995), pp. 3183–3189.
42. M. Ohtsu, "Determination of Crack Orientation by Acoustic Emission," Mat. Eval., 45 (1987), pp. 1070–1075.
43. W.H. Prosser et al., "Advanced Waveform-Based Acoustic Emission Detection of Matrix Cracking in Composites," Mat. Eval., 53 (9) (1995), pp. 1052–1058.
44. N. Sato, T. Kurauchi, and O. Kamigaito, "Material Improvement and Quality Assurance for Composite Leaf Springs Based on Microfracture Mechanism," J. Comp. Mat., 26 (9) (1992), pp. 1240–1253.
45. M. Scala and S. Mck. Cousland, "Acoustic Emission During Fatigue Crack Propagation in the Aluminium Alloys 2024 and 2124," Mat. Sci. and Eng., 61 (1983), pp. 211–218.
46. M. Scala and S.M. Cousland, "Acoustic Emission during Fatigue of Aluminium Alloy 2024: The Effect of and Overload," Mat. Sci. and Eng., 76 (1985), pp. 83–88.
47. C.B. Scruby, G.R. Baldwin, and K.A. Stacey, "Characterisation of Fatigue Crack Extension by Quantitative Acoustic Emission," Int. J. Fracture, 28 (1985), pp. 201–222.
48. M. Shiwa, S. Carpenter, and T. Kishi, "Analysis of Acoustic Emission Signals Generated During the Fatigue Testing of GFRP," J. Comp. Mat., 30 (18) (1996), pp. 2019–2041.
49. J. Sieniawski, M. Gieron, and W. Ziaja, "Application of Resistance and Acoustic Emission Measurements in Fatigue Tests of Two Phase  +
+  Titanium Alloys," J. Mat. Proc. Tech., 53 (1995), pp. 363–372.
50. H.W. Viehrig, K. Popp, and R. Rintamaa, "Measurement of Dynamic Elastic-Plastic Fracture Toughness Parameters Using Various Methods," Int. J. Pres. Ves. & Piping, 55 (1993), pp. 233–241.
51. Z.F. Wang, J. Li, and W. Ke, "Acoustic Emission Monitoring of Fatigue Crack Closure," Scripta Met. Mat., 27 (1992), pp. 1691–1694.
52. Z.F. Wang et al., "Characteristics of Acoustic Emission for A537 Structural Steel during Fatigue Crack Propagation," Scripta Met. Mat., 27 (1992), pp. 641–646.
53. Z.F. Wang, Z. Zhu, and W. Ke, "Behavior of Acoustic Emission for Low-Strength Structural Steel during Fatigue and Corrosion Fatigue," Met. and Mat. Trans. A, 22A (1991), pp. 2677–2680.
54. G.C. Weatherly, J.M. Titchmarsh, and C.B. Scruby, "The Effects of Oil on Acoustic Emission Testing of a 7010 Aluminum Alloy during Fatigue Cracking," Advances in Fracture Research (1984), pp. 3425–3431.
55. S. Yuyama, "Fundamental Aspects of Acoustic Emission Applications to the Problems Caused by Corrosion," Corrosion Monitoring in Industrial Plants Using Nondestructive Testing and Electrochemical Methods, ASTM STP 908, ASTM STP 908, eds. G.C. Moran and P. Labine (Philadelphia, PA: ASTM, 1986), pp. 43–74.
ABOUT THE AUTHORS
Miinshiou Huang earned his Ph.D. in mechanical engineering at Northwestern University in 1997. He is currently a research associate at the University of Tennessee. Dr. Huang is a member of TMS.
Liang Jiang earned his M.S. in metallurgical engineering at the University of Science and Technology, Beijing, in 1995. He is currently a graduate research assistant at the University of Tennessee. Mr. Liang is also a member of TMS.
Peter K. Liaw earned his Ph.D. in materials science and engineering at Northwestern University in 1980. He is currently a professor and Ivan Racheff Chair of Excellence in the Department of Materials Science and Engineering at the University of Tennessee. Dr. Liaw is also a member of TMS.
Charlie R. Brooks earned his Ph.D. in metallurgical engineering at the University of Tennessee in 1962. He is currently a professor at the University of Tennessee.
Rodger Seeley earned his M.S. in materials engineering at Youngstown State University in 1974. He is currently manager of technical services for Haynes International.
Dwaine L. Klarstrom earned his Ph.D. in metallurgical engineering at the University of Wisconsin–Madison in 1970. He is currently director of research and product development at Haynes International. Dr. Klarstrom is also a member of TMS.
For more information, contact M. Huang, University of Tennessee, Department of Materials Science and Engineering, 323 Dougherty Engineering Building, Knoxville, Tennessee 37996-2200; (423) 974-0645; fax (423) 974-4115; e-mail mhuang@utk.edu.
Copyright held by The Minerals, Metals & Materials Society, 1998
Direct questions about this or any other JOM page to jom@tms.org.


 min/
min/ max
max min and
  max are the applied minimum and maximum stresses, respectively. The frequency was 5 Hz initially to study crack-initiation behavior. After 2,000 cycles, the frequency was increased to 25 Hz to shorten the test time.


 K/ (1 – R) in the log-log plot for steel and aluminum alloys.21
 K/(1 – R), where B is the thickness of the specimen, E is the Young’s modulus, a' is the crack-growth rate (a' = da/dN), and
  K is the stress-intensity-factor range. The results for both steel and aluminum alloys are shown in Figure 9. The importance of the parameter, (Ba'/E)1/2
  K/(1 – R), lies in the fact that this parameter equals the square root of the energy released per cycle, which ideally should be directly related to the AE energy, as demonstrated.


 2=
2= 2/
2/ x2+
x2+ 2/
2/ y2+
y2+ 2/
2/ z2, (x, y, z) is the coordinate system,
  is the density of the material, and
  and µ are Lame's constants. According to Helmholtz's theorem,18,40 the vector field, u, can be written as the summation of a gradient of a scalar field,
  , and a curl of a zero-divergence vector field, H


 = 15° and (2)
  = 60°, where U and T are the nondimensional amplitude and time, respectively, and
  is the angle from the cracking surface.33
 0 is the material-breaking strength, and
  ij are the stress components.


 +
+  Titanium Alloys," J. Mat. Proc. Tech., 53 (1995), pp. 363–372.