 |
|
|---|
 |
|
|---|
 |
|---|
| CONTENTS |
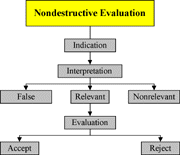
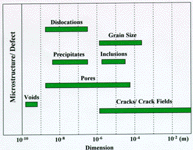
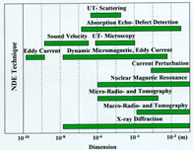
According to the ASTM Guideline of Standard Terminology for Nondestructive Examinations,7 NDE or nondestructive testing (NDT) is defined as the development and application of technical methods to examine materials or components in ways that do not impair future usefulness and serviceability in order to detect, locate, measure, and evaluate flaws; to assess integrity, properties, and composition; and to measure geometrical characteristics. Through NDE, the defects and/or flaws in a material can be determined as false, relevant, or nonrelevant indications. This defect information is then evaluated to determine if the component meets specified acceptance criteria. Figure 1 presents a schematic of a typical NDE procedure.7 Figure 2 shows the linear dimensions of microstructures and defects as well as the resolution capabilities of various NDE techniques.8
 |
 |
 |
| a | b | |
| Figure 1. A schematic description of the procedure for NDE.7 | Figure 2. The (a) linear dimensions of microstructures and defects and (b) resolution capabilities of NDE techniques.8 | |
To consider when and how various NDE techniques can be best applied to the examination of ceramic materials, this paper overviews the following approaches: ultrasonic testing (UT), radiography, x-ray computed tomography (CT), and acoustic emission (AE). Table I provides a comparison of these NDE techniques as applied to the realm of advanced ceramics.
| Table I. Key NDE Techniques for Analyzing Advanced Ceramics and Composites | ||||
|---|---|---|---|---|
| Characteristics | Ultrasonics | X-ray Computed Tomography | Radiography | Acoustic Emission |
| Principles | Sonic transmission | X-ray transmission | X-ray, gamma-ray, and neutron transmission of penetrating radiation | Stress wave emission |
| Variables | Scattering, attenuation, and velocity | Absorption and attenuation coefficients | Absorption and attenuation coefficients | Amplitude, counts, and number of events |
| Advantages | Suitable for thick materials; relatively quick testing time | Creates cross-sectional view of the entire transmitted thickness | Extensive available database | Real-time monitoring |
| Limitations | Requires water immersion or acoustic coupling | Expensive; limited specimen size; radiation hazard | Expensive; depth of defect not indicated; radiation hazard | Requires a prehistory of stresses for flaw detection |
| Detectable Flaws | Voids, delaminations, porosity, and inclusions | Voids, delaminations, porosity, and inclusions | Voids, delaminations, porosity, and inclusions | Delaminations and inclusions |
Sound that possesses frequencies so high that it cannot be heard is called ultrasound (the frequency range is typically greater than 20 kHz). In ultrasonic testing, beams of high-frequency sound waves are introduced into materials so as to detect both surface and internal flaws.9 The sound waves travel through the material (with some attendant loss of energy) and are deflected at interfaces and/or defects. The deflected beam can be displayed and analyzed to assess the presence of flaws or discontinuities. Most ultrasonic inspections are performed at frequencies between 0.1 MHz and 25 MHz.
A number of ultrasonic evaluation methods–such as A-, B-, and C-scans–have been used to study various types of flaws in ceramic materials.2-5,10 The UT A-scan presents one-dimensional defect information. In the oscilloscope view, the A-scan signal displays the pulse and amplitude against time. The A-scan display is commonly used to measure material thickness. The UT B-scan displays a parallel set of UT A-scans with two-dimensional data (i.e., the B-scan presents defect distribution through the material’s cross section). The B-scan can also be used to inspect rotating tubes and pipes, because it provides a cross-sectional view of defect distribution. The UT C-scan is the most widely used scan mode, as it provides a two-dimensional presentation of defect distribution. A C-scan displays the size and position of flaws in an area parallel to the surface through the raster scan of two axes. A C-scan presentation is a very effective way to investigate flaw distribution, since the presence of the flaw as well as its severity can be readily indicated on a drawing of the part being inspected.
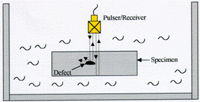
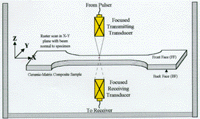
To measure the time of flight or attenuation of the UT signal, the UT scan mode may be employed in either in a through-transmission mode (using both a transmitting transducer and a receiving transducer) or a pulse-echo mode (using a single pulser/receiver transducer). Figure 3 presents a pulse-echo mode setup with a pulser/receiver transducer and the through-transmission ultrasonic (TTU) setup using a pair of focused transducers. The scan is performed in an immersion tank. In Figure 3a, the pulser/receiver transducer is used to generate ultrasonic sound waves and receive the reflected beams. The transducer obtains the traveling sound-wave signals, which are displayed on the oscilloscope with amplitudes against the traveling time. Finally, a computer gathers the amplitudes and forms a scan image. In the TTU mode, the transmitting transducer (pulser) and receiving transducer (receiver) are aligned, and the beam path is kept perpendicular to the test specimen during the scan (Figure 3b). The two transducers are ganged using a yoke arrangement that maintains the alignment of the focused beam.
 |
 |
 |
| a | b | |
| Figure 3. Setups for ultrasonic scanning: (a) pulse-echo mode with a pulser/receiver transducer and (b) through-transmission using a pair of focused transducers in an immersion tank. | Figure 4. Ultrasonic C-scans for woven Nicalon/SiC tensile specimens.11-13 Relative amplitudes range from 0 (least relative amplitude) to 1 (greatest amplitude). | |
The amplitude of the transmitted ultrasonic beam is measured by the receiving transducer, which is also focused and positioned symmetrically with respect to the transmitting transducer. The amplitude of the TTU signal is quite sensitive to the presence of internal defects (e.g., voids and delaminations) and to variations in the internal structure (e.g., undulation of fiber tows in continuous-fiber-reinforced ceramic-matrix composites). Any defects or internal material conditions that attenuate, scatter, or block the transmitting ultrasonic beam will result in a low TTU signal in the C-scan image.
Figure 4 shows UT C-scans of continuous woven Nicalon®-fiber-reinforced SiC ceramic-matrix composites. Nicalon is an amorphous/crystallite fiber, predominantly SiC, with a diameter of approximately 10-15 µm and having a chemical composition of Si-31C2-10O2 (wt.%). Most tensile test specimens were 3 mm thick, 18 mm in width, and 200 mm in length. Specimens with a gage dimension of 10 mm  60 mm were machined from the woven composites.
Ultrasonic amplitude measurements were performed using a TTU C-scan mode at a frequency of 15 MHz in an immersion tank (Figure 3b). The transducers had a diameter of 1.27 cm and a focus length of 5.08 cm. Generally, a UT C-scan presentation can be described as consisting of different color scales. In Figure 4, the color scheme is arranged such that blues and greens correspond to high amplitudes of transmitted ultrasonic signals, which are less attenuated by the anomalies and derive from the overall "good" or dense regions in the composites. The reds and yellows represent low amplitudes, which are greatly attenuated by the defects and result from generally "bad" or porous areas. This color scheme is based on the relative amplitude range of transmitted ultrasonic waves. Relative amplitudes range from 0 (least relative amplitude) to 1 (greatest amplitude). Defect distribution is designated as a C-scan in light of the ultrasonic-transmitted amplitudes. In other words, for an area containing a greater amount of defects, more ultrasonic waves will be deflected or scattered by the defects, resulting in the transmitted ultrasonic waves having lower amplitudes.
 |
 |
 |
| a | b | c |
 |
 |
 |
| d | e | f |
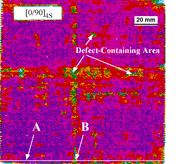
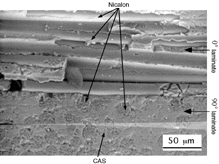
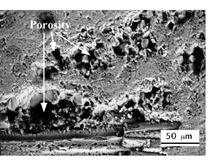
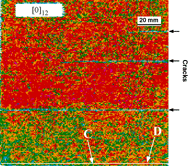
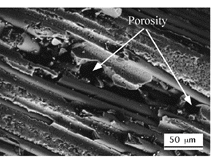
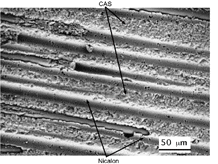
| Figure 5. Ultrasonic C-scans of the (a) [0/90]4S cross-ply panel and (d) [0]12 unidirectional panel from a Nicalon/CAS composite with SEM cross-sectional views of the microstructures in (b) Section A, (c) Section B, (e) Section C, and (f) Section D. (The C-scans are presented courtesy of D.K. Hsu at Iowa State University.) |  |
|
 152.4 mm
  3 mm. For the [0/90]4S panel, the Nicalon/CAS composite was prepregged into unidirectional plies with a 40% fiber volume and hot-pressed into a [0/90]4S laminate panel. For the [0]12 unidirectional composite, the Nicalon/CAS composite was supplied in a 12-ply, unidirectionally reinforced ([0]12) panel. Fabricated using 500-count fiber tows, this material was produced by hot pressing at about 1,350°C using prepregged unidirectional plies.
In the case of UT for the [0/90]4S cross-ply panel (Figure 5a), there are variations of ultrasonic amplitude, particularly along a horizontal line and a vertical line through the center of the panel. For the [0]12 unidirectional panel (Figure 5d), the ultrasonic transmitted amplitudes revealed two cracks in addition to the long crack across the width (horizontal line). As a whole, the upper and lower sections of the panel contained more defects than the center section.
Analysis via scanning electron microscopy (SEM) was performed to relate the different amplitude distributions on the panel edges. As shown in Figure 5a, Section A had relatively greater ultrasonic amplitude values than Section B; hence, the processing-induced porosity was found not in Section A (Figure 5b) but in Section B (Figure 5c). In the case of the [0]12 unidirectional composite panel, Sections C (lower amplitude values, as shown in Figure 5d) and D (higher amplitude values, again as shown in Figure 5d) were selected for SEM investigation. In Section C (Figure 5e), severe porosity is visible at the fiber-matrix interface; Section D (Figure 5f) reveals good microstructural features. Clearly, the suite of figures that comprise Figure 5 demonstrates that lower ultrasonic amplitudes correspond to the presence of porosity. This occurs because such defects scatter and deflect the UT waves.
 |
| Figure 6. An illustration of specimen geometry for the woven Nicalon/SiC composites used in modulus measurements. |
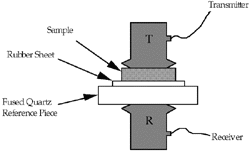 |
| Figure 7. Ultrasonic setup for measuring the modulus in Nicalon/SiC composites.14 |
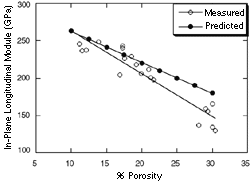 |
| Figure 8. A comparison of predicted and measured in-plane longitudinal moduli in Nicalon/SiC composites.14 |
 | (1) |
where  is the density of the composite.
Dry-coupling longitudinal transducers were used because the Nicalon/SiC samples were highly porous and the use of a liquid or gel couplant would change the modulus values, thereby contaminating the samples. The dry contact transducers had a thin elastomer face-sheet and coupled the ultrasonic propagation by pressure, without the aid of a liquid or gel couplant. The transducers had a crystal size of 19.1 mm and a center frequency of 0.5 MHz.
A pulse-echo overlap method was used to measure wave velocity. As depicted in Figure 7, the reference signal was captured by passing ultrasonic longitudinal waves through a sample positioned between a rubber sheet and a fused quartz piece. The received radio-frequency waveforms, with and without a sample in the acoustic path, were matched as closely as possible by shifting one to overlap with the other (hence the name pulse-echo overlap). Since the time shift required for the match is equal to the transmit time of the ultrasonic waves through the sample, the ultrasonic longitudinal velocity is simply the sample thickness divided by the time shift. Both in-plane and through-thickness longitudinal ultrasonic velocities were measured for the composite material and yielded in-plane moduli and through-thickness moduli.
The ultrasonic velocities (0.8-1.0  104 m/s) were greater in the in-plane direction than in the through-thickness direction (0.17-0.73
  104 m/s). Consequently, the in-plane longitudinal moduli (130-248 GPa) were greater than the through-thickness longitudinal moduli (6-138 GPa) as is to be expected from the fabric lay-up.14 Porosity had a greater effect in reducing ultrasonic velocity in the through-thickness direction than in the in-plane direction. These results derive from the greater interlaminar porosity as compared to the porosity at the fiber-tow intersection.14 Furthermore, increased porosity significantly decreased both in-plane and through-thickness moduli. It should be noted that the ultrasonic measurements yielded comparable in-plane moduli values along the fiber fabric plane shown in Figure 6.
Figure 8 presents the predicted in-plane moduli of Nicalon/SiC composites versus porosity. Clearly, there is reasonably good agreement between the predicted and the measured moduli. Consistent with what was observed experimentally, increased porosity decreased the stiffness. (Greater detail on the moduli calculation can be found in Reference 14).
In general, radiographic NDE can be classified according to the type of radiation employed: x-ray, gamma, or neutron.
NDE using x-ray or gamma rays includes capturing and processing a shadow photograph. Specifically, the varying amounts of transmitted radiation cause ionization in the emulsion surface of the film, forming a latent image. The radiographic sensitivity of the resulting photograph is limited by the quality of the shadow image, by the scatter of radiation in the test object, by the test environment, and by the nature of the film emulsion.
In neutron radiography, the image is essentially a two-dimensional shadow display representing the intensity distribution of thermal neutrons passing through an object. As compared to x-ray or gamma-ray radiography, the attenuation characteristics of neutron energy are different. Here, the total neutron cross section is the criterion for utilizing neutron radiography, whereas density and atomic number (linear absorption coefficient) are the main parameters in x-ray and gamma-ray radiography. Generally, neutron radiography complements conventional x-ray and gamma-ray radiography as it can detect flaws and material conditions that other methods cannot effectively assess.
Although radiography has numerous advantages, it is not without certain drawbacks. For example, access to opposite sides of the test object is required, and some structures are not amenable to study (e.g., components in radioactive or high-temperature environments). To maximize the likelihood of detection, cracks must be oriented nearly parallel to the beam. Delaminations are almost always undetectable. Finally, the use of radiography is a health risk, and the technique is expensive.
Lewis et al. conducted extensive work with Si3N4 composites and Al/Si/Al2O3 composites to contrast the capabilities of neutron and x-ray radiography.17 They found that neutron radiography is capable of producing good-quality images on a wider range of ceramic composites than x-ray radiography and that it is better suited for examining thicker sections in these materials.
Highly sensitive microfocus x-ray radiography was used to detect and measure micrometer-sized defects in ZrO2 pellets.18 Artificial flat-bottom holes and saw cuts of different depths were made to the pellets to use as calibration standards.
 |
 |
| a | b |
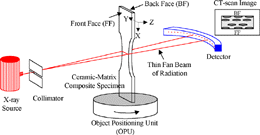
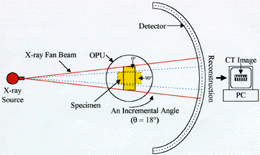
| Figure 9. The (a) experimental setup for obtaining a CT-scan image and (b) reconstruction procedure. | |
 ). The data-acquisition system reads the signal from each detector in the array, converts the measurements into numeric values, and transfers the data to a computer for digital reconstruction. The reconstruction process (Figure 9b) uses an algorithm to identify the point-by-point distribution of the x-ray densities in the two-dimensional image of the cross-sectional slice.23 In the example depicted in Figure 9b, the incremental rotation angle equals 18°; this means that ten different cross-sectional views were collected in order to construct a CT image.
The fundamentals of CT are described in the sidebar.
| CT THEORY | ||||||||||||
|---|---|---|---|---|---|---|---|---|---|---|---|---|
| Since CT images are related to x-ray radiation, attenuation is followed by Lambert's law of absorption. In the simplest case, the linear absorption coefficient can be expressed by23
where I is the intensity of the transmitted x-ray beam after passing through thickness x, I0 is the intensity of the incident beam, and m is the linear absorption coefficient. When x-rays penetrate a nonhomogeneous material, the general expression for absorption should be
where, m (s) is the linear absorption coefficient at each point on the x-ray path. Rearranging Equation B yields
The CT reconstruction procedure includes two basic types of transform methods: the convolution-backprojection algorithm and the direct Fourier algorithm. Fundamental concepts of these methods are such that the one-dimensional Fourier transform of a CT projection for an object corresponds to a spoke in the Fourier space of the two-dimensional transform of that object. After transforming each collected projection, it is necessary to invert the two-dimensional Fourier transform to obtain the final image (the direct Fourier transform algorithm). Through the convolution-backprojection methods, the results of Equation C can be rearranged in the following form:
where I is a single ideal measurement of the intensity (representing the oriented detector with respect to the object with the incremental angle, q, and position, r), m(x,y) is a two-dimensional distribution of the linear attenuation coefficient for the object, and ds is an element of the distance along the x-ray path through the object at an angle, q, and position, r. The values of I(q,r) are normalized to unity and logged to yield a set of estimated line integrals through the object, P(q,r). Thus, the convolution-backprojection process can be written as follows:
where g is the convolution (filter) function of the shape-theoretical form and
where d(r) is the Dirac delta function, and r is the radius of a reconstruction circle. From Equations E and F, m(x,y) can be recovered from a complete set of line integrals, P(q, r), by first convolving each projection with a special function, g (i.e., the integral over h in Equation E), and backprojecting each convolved view to obtain a final image (i.e., the integral over q in Equation E). Convolving the views with the function, g, given in Equation F serves two purposes:
Note that if the convolution is conducted in a direct space (i.e., the inner integral in Equation E is evaluated directly), the method is called convolution-backprojection; if it is conducted in a Fourier space (which is generally a much faster approach), the technique is called filtered-backprojection. This distinction is frequently overlooked, and the two terms are often used interchangeably. In our research, the filtered-backprojection technique is used to investigate ceramic-matrix composites. |
The CT scans were made through three different cross sections for each specimen, as indicated by the letters A, B, and C (the adjoining numbers identify the samples). These sections were carefully chosen to relate the ultrasonic C-scan images with the CT results. For example, the sections of the woven composite were chosen as the best (A), worst (B), and intermediate (C) C-scan amplitude distributions. Note that A and C are located in the grip sections of the samples, while B is from the gage section.
A visual examination of the C-scan versus the CT images shows a reasonably good relationship between the amount of porosity and the transmitted amplitudes. The dark areas in the CT images indicate the presence of porosity and/or defects in the composites. In the case of the woven specimen (Figure 10a), 3A includes fewer defects and, correspondingly, greater ultrasonic wave amplitudes than any other section. The CT results present a good correlation with the C-scan data. Specifically, the CT-scan of 3A shows less porosity than sections 3B or 3C.
In analyzing the relationship between the ultrasonically transmitted amplitudes and the volume of porosity along the width of the woven and cross-ply composite specimens, it was observed that, in both cases, the ultrasonically transmitted amplitude decreases as porosity increases. Indeed, there is an exponential relationship between the ultrasonically transmitted amplitude and the amount of porosity, which provides an effective and consistent way to assess the quality of continuous-Nicalon-fiber-reinforced silicon carbide composites using both UT and CT.
The exponential function of this relationship is derived according to the following equation:13
 | (2) |
where the ratio A/A0 is the relative ultrasonic transmitted amplitude, n is the number density for porosity, and f is a constant.
Recently, CT has been extensively used to characterize ceramic components, including ceramic failure analysis,24 composite-structure developments,25 and microstructural characterization in ceramic composites.26
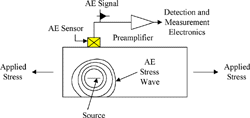
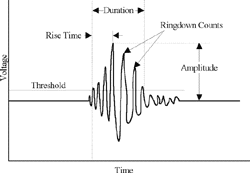
The process of wave generation and detection is shown in Figure 11a.27 Generally, AE equipment includes piezoelectric transducers, amplifiers, single- and multi-channel signal processing systems, acoustic-event counters, and coordinate plotters.3,5 A typical AE signal is shown in Figure 11b along with such AE parameters as amplitude (the highest peak voltage attained by an AE waveform), counts (the threshold-crossing pulses), energy counts (the measured area under the rectified signal envelope), duration (the elapsed time from the first threshold crossing to the last), and rise time (the elapsed time from the first threshold crossing to the signal peak).27
 |
 |
| a | b |
| Figure 11. The (a) basic principle of AE analysis and a (b) typical AE signal.27 | |
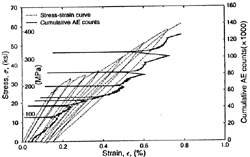
In terms of ceramic-based materials, the rate and intensity of acoustic emissions may be used to detect the initiation and propagation of cracks and delaminations,29-32 and acoustic emission NDE can be used to predict static and fatigue failure.33
 |
|
| Figure 12. Stress and cumulative AE counts versus strain for the loading and unloading a unidirectional SiC/CAS composite under longitudinal tension.30 | |
Shiwa et al. investigated fracture mechanisms in SiC/SiC composites using AE analysis.31 Monitored during tensile testing were such fracture mechanisms as matrix cracking, crack deflection, interface debonding, and fiber pull-out. The AE amplitude distribution was used to determine the corresponding fracture mechanisms.
AE analysis also has been used to predict fatigue failure in ceramic materials subjected to cyclic mechanical loading.33 It was capable of predicting failure by showing an increase in the energy/count rate prior to failure during tension-tension fatigue loading.
The main advantages of UT are the ability to investigate relatively thick materials and obtain test results quickly. The approach does, however, require an acoustic coupling media. CT provides a cross-sectional view of the entire material, but the equipment cost is expensive. The technique, along with radiography, also raises issues of radiation safety. AE is a unique method in that it provides continuous surveillance during the testing, but it requires a prehistory of stresses for defect detection.
ABOUT THE AUTHORS
Jeongguk Kim earned his B.E. in inorganic materials engineering at Pusan National University in 1987. He is currently a Ph.D. student at the University of Tennessee at Knoxville. Mr. Kim is also a member of TMS.
Peter K. Liaw earned his Ph.D. in materials science and engineering at Northwestern University in 1980. He is currently professor and Ivan Racheff Chair of Excellence in the Department of Materials Science and Engineering at the University of Tennessee at Knoxville. Dr. Liaw is also a member of TMS.
For more information, contact P.K. Liaw, University of Tennessee at Knoxville, Department of Materials Science and Engineering, Knoxville, Tennessee 37996-2200; (423) 974-6356; fax 423-974-4115; e-mail pliaw@utk.edu.
Direct questions about this or any other JOM page to jom@tms.org.
| Search | TMS Document Center | Subscriptions | Other Hypertext Articles | JOM | TMS OnLine |
|---|