
An Article from the January 2003 JOM-e: A Web-Only Supplement to JOM
 |
TMS
ONLINE | TMS
PUBLICATIONS | SITE
MAP An Article from the January 2003 JOM-e: A Web-Only Supplement to JOM |
|
|
|
|
Jeongguk
Kim and Peter K. Liaw are with the Department of Materials Science and
Engineering at the
University of Tennessee. Hsin Wang is with the High Temperature Materials
Laboratory at Oak
Ridge National Laboratory.The authors of this article are with
Calcom SA.
|
Exploring traditional, innovative, and revolutionary issues in the minerals,
metals, and materials fields.
|
| OUR LATEST ISSUE |
|
| OTHER ARTICLES IN THE SERIES |
|---|
|
| |
Continuous-fiber-reinforced ceramic-matrix composites (CFCCs) are promising
materials for high-temperature structural applications.1–8
They provide good corrosion resistance and a good balance of strength and toughness
at temperatures above 1,000°C, and they are lightweight compared to metallic
materials. Due to those advantages, CFCCs have been widely used for high-temperature
structural and aerospace applications such as heat exchangers, gas turbines,
and space shuttle engine components.
To encourage wide applications of CFCCs, nondestructive evaluation (NDE) is
essential not only for assuring manufacturing quality and lifetime service applications
of CFCCs, but also as a characterization means for the research and development
of advanced materials. Nondestructive evaluation techniques such as ultrasonic
testing (UT) and infrared (IR) imaging can be powerful methods to investigate
fracture behavior and defect information in the composites.
Several NDE techniques are available for assessing the integrity of composite
materials.9,10
For example, the UT method has become one of the most commonly used inspection
techniques to determine the quality and internal structure of composite materials.9–20
The attenuation of ultrasonic signals through the material, which results from
the interactions between ultrasonic waves and defects or microstructural features
in the composite, can be determined by measuring transmitted ultrasonic amplitudes.
Ultrasonic testing has been successfully applied to characterize composites
based on variations in transmitted ultrasonic amplitudes.9–20
The transmitted ultrasonic waves can be related to the presence of defects and
anomalies in the composites.
Infrared (IR) thermography, another NDE method for the characterization of CFCCs,
is based on the concept that after applying a uniform heat pulse to a sample
surface, a localized disruption of the heat flow will occur when defects and/or
flaws are present. The change in heat flow translates into temperature differences
on the material surface,21–26
which can be used to create thermographic images in terms of either temperature
difference or thermal diffusivity. In this study, IR thermography was employed
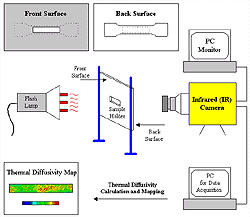
to map the through-thickness thermal diffusivity of CFCC specimens and relate
the results to the UT-transmitted amplitude. Infrared thermography can also
be used for in-situ measurements of temperature changes during mechanical testing.
However, relatively little work has been performed relating the NDE results
to understanding the mechanical behavior of CFCCs. Therefore, the main objectives
of this research are to assure the quality and structural integrity of Nicalon/SiC
composites using NDE techniques; to perform NDE using UT and IR thermography
methods for the analyses of defect distributions that may affect mechanical
properties; to investigate tension behavior of Nicalon/SiC composites with the
aid of NDE methods; and to provide fracture and NDE information to aid in the
fabrication, development, and selection of Nicalon/SiC composites for structural
applications.
The Materials Systems
|
|
|
|
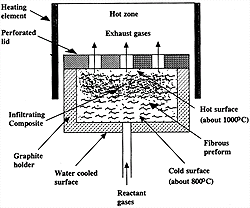
Figure 1. A schematic illustration of the chemical vapor infiltration process.27 |
| |
||
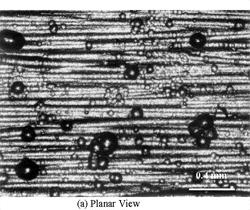
| Figure 2. The microstructures of plain-weave Nicalon/SiC composites. |
||
| |
||
 |
|
|
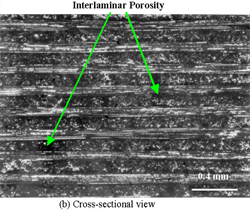
Figure 3. The microstructures of cross-ply Nicalon/SiC composites. |
||
Using the CVI method, the two types of laminated Nicalon fiber fabric preforms
were deposited in an inductively heated susceptor cavity such that the preforms
and the methyltrichlorosilane (CH3SiCl3)
gas were maintained at a uniform temperature of approximately 1,000°C. Silicon
carbide was deposited from the decomposition of the methyltrichlorosilane gas
at the uniform temperature.
NDE of Composites before Mechanical Testing
Nondestructive evaluation techniques were used to characterize the defect distribution
and to provide defect information for composites before mechanical testing.
Nondestructive characterization with as-received specimens could provide inherent
defect information and/or distributions, which may affect the fracture behavior
during mechanical testing. At first, UT was applied to CFCCs specimens to provide
a 2-D defect distribution as a function of ultrasonic transmitted amplitudes.
The other NDE technique, IR thermography, was employed for thermal-diffusivity
mapping of CFCCs specimens.
|
|
|
|
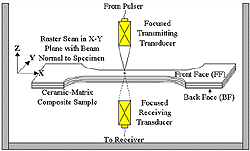
Figure 4. A schematic of the through-transmission ultrasonic testing setup. |
Ultrasonic Testing
Ultrasonic NDE is the most widely used technique for the detection and characterization
of composite materials.9–20
Ultrasonic testing (UT) is a nondestructive method in which beams of high-frequency
sound waves are introduced into materials for the detection of both surface
and internal flaws.11–20
The UT sound waves travel through the material with some attendant loss of energy
and are deflected at interfaces and/or defects. The deflected beam can be displayed
and analyzed to assess the presence and location of flaws or discontinuities.
Most ultrasonic inspection is done at frequencies between 0.1 MHz and 25 MHz.
In this research, ultrasonic amplitude measurements were performed using a through-transmission
C-scan mode at a frequency of 15 MHz, in an immersion tank (Figure
4).
Figure 4 shows a schematic diagram of
the through-transmission ultrasonic (TTU) setup using a pair of focused transducers.
The transmitting transducer (pulser) and receiving transducer (receiver) are
aligned with each other. The beam path is always kept perpendicular to the test
specimen during the scan and the specimen is placed at the focal zone. In this
work, the transducers have a diameter of 1.27 cm and a focus length of 5.08
cm.
The reason for selecting the TTU geometry is partly due to the high attenuation
of the material and the difficulty of obtaining and interpreting pulse-echo
signals. In the TTU approach, a time-gate is applied to encompass the transmitted
signal and to record its amplitude during an UT C-scan.
Moreover, the C-scan image was developed by capturing and displaying the transmitted
signals in a raster scan along the X-Y plane of the test sample (Figure
4). Because the specimen was fairly porous and was immersed in water, some
of the surface-breaking voids were filled by water. This phenomenon can have
an effect on the scan results, depending on the relative volume percent of surface-breaking
voids and blind voids. For the specimens used in this work, this effect was
not a major factor. However, further work is underway to eliminate the problem
of water intake.
The amplitude of the transmitted ultrasonic beam is measured by the receiving
transducer, which is also focused and positioned symmetrically with respect
to the transmitting transducer. The amplitude of the TTU signal is quite sensitive
to the presence of internal defects, such as voids and delaminations, and to
variation of the internal structure, including the undulation of fiber tows.
Any defects or internal material conditions that attenuate, scatter, or block
the transmitting ultrasonic beam will result in a low TTU signal in the C-scan
image.
|
|
|
|
Figure 5. A schematic illustration for mapping thermal diffusivity of Nicalon/SiC samples using a xenon-flash method. |

|
(1) |
| (2) |
where t0.5 is the half-rise time.29,30
Tensile Testing
Monotonic tensile tests were conducted using a computer-controlled Material
Test System 810 servohydraulic frame equipped with hydraulic grips. The tensile
tests were performed at room temperature under displacement control at a cross-head
speed of 0.5 mm/min. In this study, dog-bone type flat specimens were used to
investigate the damage evolution during mechanical tests. The IR camera was
employed for in-situ monitoring of the temperature change during the tests.
Aluminum tabs were attached with epoxy glue at each side of the shoulder section
of the coupon in order to avoid the rupture of the grip parts during loading
the sample.
NDE before Tensile Testing
In order to obtain a defect distribution and/or information for as-received
samples, UT C-scans were performed on CFCC samples and a xenon-flash technique
was used to obtain thermal-diffusivity maps. Figures 6a
and 6b present the NDE results prior
to mechanical testing (i.e., the UT C-scan and thermal-diffusivity map for the
plain-weave Nicalon/SiC composite, respectively).
| |
||
| Figure 6. A qualitative relation between (a-left) a UT C-scan and (b-right) a thermal-diffusivity map obtained for the plain-weave Nicalon/SiC sample before mechanical testing. Note that all NDE results were obtained from the gage section of each dog-bone type flat bar tensile specimen. |
||
| |
||
| |
||
| Figure 7. A qualitative relation between (a-left) a UT C-scan and (b-right) a thermal-diffusivity map obtained for the 0°/90° cross-ply Nicalon/SiC sample before mechanical testing. Note that all NDE results were obtained from the gage section of each dog-bone type flat bar tensile specimen. |
||
| |
||
After the investigation of the qualitative correlation between the UT amplitude
and thermal-diffusivity, quantitative analyses were conducted on Nicalon/SiC
samples based on both kinds of NDE results. The current image analyses were
performed on a Macintosh computer using the public domain NIH Image program
[developed at the U.S. National
Institutes of Health (NIH) and available on the Internet at http://rsb.info.nig.gov/nih-image/]
to establish a quantitative relationship between the UT amplitude and thermal
diffusivity. Since both the UT C-scan and thermal-diffusivity images presented
more variations along the length direction of the specimen, a line profile was
drawn along the length direction with the center of the specimen.
The NIH Image software is very effective for analyzing an image containing
the digitized data. Fundamentally, it uses a scaling system for pixels, with
a one-to-one correspondence to the darkness of an image. The fundamental concept
of the NIH Image analyzer is based on the densitometric analysis, which
depends on color-density measurements between pixels of an image. Through these
analyses, the results of the relative density calculations in the different
color density areas can be obtained. On the NIH Image analyzer, regions
containing the lower UT amplitude or lower thermal diffusivity are assumed to
be of light color (red or yellow colors) on both images, whereas the dark regions
(green or blue colors) are regarded as the higher UT amplitude or higher thermal-diffusivity
areas. A relative color distinction between the light and dark regions made
possible the quantitative calculations of the UT amplitude and thermal diffusivity
on both images.
The NIH Image software provides a plot profile for a given line profile,
and the plot profile [pixels (y-axis) vs. the length of the line profile
(x-axis)] can be converted into data values. Then, the relative pixel
values for the subsequent image analysis could be obtained. The same image analyses
were performed for plain-weave and cross-ply Nicalon/SiC composites. Since there
were differences in resolution (pixel size) between the images (i.e., the thermal-diffusivity
map showed about 380 to 400 pixels along the length direction of the sample
while the UT C-scan image contained 220 to 250 pixels along the length direction
of the sample) with different samples. Twenty data points, equally spaced along
the length direction of each sample, per each image were carefully selected
to perform the direct comparison between the two images. Each data point was
obtained by taking an average of the values from each portion among 20 portions.
Figures 8 and 9
show the relation between the UT amplitude and thermal diffusivity for plain-weave
and cross-ply Nicalon/SiC composites, respectively. As predicted in previous
images (Figures 6a and 6b),
the plain-weave sample presents relatively lower values of UT amplitudes with
50% to 60% of the relative UT-transmitted amplitude.
Also, it is understandable that there is a correlation between the thermal diffusivity
and UT amplitude. In other words, the UT amplitude generally increases as thermal
diffusivity increases, as exhibited in Figure
8, for plain-weave composites. In cross-ply composites, it was observed
that the thermal diffusivity increases with increasing the UT amplitude, as
shown in Figure 9.
Although a relationship seems to exist between the two images of the UT C-scan
and thermal-diffusivity map, it is difficult to say whether it is a linear,
exponential, or polynominal function. Further study is needed to predict the
exact trend between the two images.
Figure 10 represents the positions of
actual fracture after tensile testing. Nondestructive evaluation results before
mechanical testing showed a defect distribution in terms of UT-transmitted amplitudes.
The data also indicated the possibility of the presence of the defects and/or
porosity. Tensile testing found that the actual failures occurred at the defect-rich
areas or lower UT-transmitted amplitudes, as shown in Figure
10 for both plain-weave and cross-ply Nicalon/SiC composites. In this respect,
NDE before mechanical testing is important to provide defect information of
the virgin material as well as to predict the final rupture position. Moreover,
NDE can be a powerful characterization means to obtain this kind of information.
| |
|
|
| Figure 11. (a-top left, c-bottom left) IR camera images and (b-top right, d-bottom right) temperature evolutions during tensile testing for the plain-weave Nicalon/SiC composite. |
Figure 12. (a-top left, c-bottom left) IR camera images and (b-top right, d-bottom right) temperature evolutions during tensile testing for the cross-ply Nicalon/SiC composite. |
|
| |
| |
|
|
| Figure 15. Severe delaminations after failure of the 0° and the 90° laminates in the cross-ply Nicalon/SiC composite. |
Figure 16. A cross-sectional view of the fracture surface in the cross-ply Nicalon/SiC composite (5°C temperature increase at the time of fracture). |
|
| |
|
This work is supported by the National Science Foundation, the Combined Research-Curriculum Development Program under contract No. EEC-9527527, the Division of Design, Manufacture, and Industrial Innovation, under contract No. DMI-9724476, and the Integrative Graduate Education and Training Program, under contract No. DGE-9987548 with M.F. Poats, D.R. Durham, W. Jennings and L. Goldberg as contract monitors, respectively. Also, the research is sponsored by the assistant secretary for energy efficiency and renewable energy, Office of Transportation Technologies, as part of the High-Temperature Materials Laboratory User Program, Oak Ridge National Laboratory, managed by Lockheed Martin Energy Research Corporation for the U.S. Department of Energy under contract number DE-AC05-96OR22464. The authors appreciate H. Wang of Oak Ridge National Lab for his excellent technical support on IR thermography.
1. R.L. Lehman,
S.K. El-Rahaiby, and J.B. Wachtman, Handbook on Continuous Fiber-Reinforced
Ceramic Matrix Composites (Westerville, OH: The
Am. Ceram. Soc., 1995), p. 495.
2. P.K. Liaw, “Fiber-Reinforced
CMCs: Processing, Mechanical Behavior and Modeling,” JOM,
47 (10) (1995), p. 38.
3. P.K. Liaw et al.,
Acta
Metal. et Mater., 44 (5) (1996), p. 2101.
4. N. Miriyala et
al., J.
Nuclear Materials, 253 (1998), p. 1.
5. N. Miriyala and
P.K. Liaw, “CFCC Fatigue: A Literature Review,” JOM,
49 (7) (1997), p. 59.
6. N. Miriyala and
P.K. Liaw, “The Monotonic and Fatigue Behavior of CFCCs,” JOM,
48 (9) (1996), p 44.
7. W. Zhao, P.K. Liaw,
and N. Yu, J.
Nuclear Materials, 253 (1998), p. 10.
8. J.H. Miller, P.K.
Liaw, and J.D. Landes, Mater.
Sci. and Eng. A, 317 (1-2) (2001), p. 49.
9. S. Ness, and C.N.
Sherlock, technical eds., P.O. Moore and P.M. McIntire, eds., Nondestructive
Testing Handbook, vol. 10, Nondestructive Testing Overview, 2nd ed. (Columbus,
OH: American Society for Nondestructive
Testing, 1996).
10. ASM Handbook,
vol. 17, Nondestructive Evaluation and Quality Control (Metals Park,
OH: ASM Int.,
1992), p. 231.
11. D.K. Hsu et
al., Mat. Res. Soc. Symp. Proc., 365 (Pittsburgh, PA: MRS:
1995), p. 203.
12. P.K. Liaw et
al., J.
Nuclear Materials, 219 (1995), p. 93.
13. D.C. Kunerth,
L.A. Lott, and J.B. Walter, Ceram. Eng. Sci. Proc., 11 (9-11) (1990),
p. 1685.
14. J. Kim and P.K.
Liaw, JOM-e,
50 (11) (1998), (http://www.tms.org/pubs/journals/JOM/9811/Kim/Kim-9811.html).
15. J. Kim et al.,
Nondestructive Evaluation of Continuous Nicalon Fiber Reinforced Silicon
Carbide Composites, Nondestructive Evaluation and Materials Properties III,
ed. P.K. Liaw et al. (Warrendale, PA: TMS,
1997), p. 55.
16. J. Kim et al.,
“Nondestructive Evaluation of Nicalon/SiC Composites by Ultrasonics and
X-ray Computed Tomography,” Ceramic Engineering and Science Proceedings,
18 (4) (1997), p. 287.
17. P.K. Liaw et
al., “Nondestructive Evaluation of Woven Fabric Reinforced Ceramic Composites,”
Nondestructive Evaluation of Ceramics, Ceramic Transactions, vol. 89,
ed. C. Schilling et al. (Westerville, OH: Amer.
Cer. Soc., 1998), p. 121.
18. J. Kim et al.,
“Thermal and Mechanical Characterization of Ceramic Matrix Composites
by Nondestructive Evaluation (NDE) Techniques,” Ceramic Transactions,
vol. 124, ed. J.P. Singh, Narottam P. Bansal, and E. Ustundag (Westerville,
OH: Amer. Cer. Soc., 2001),
p. 241).
19. J. Kim et al.,
“Damage Assessment of Ceramic Matrix Composites by Nondestructive Evaluation
Techniques,” Fatigue
and Fracture Behavior of High Temperature Materials, ed. P.K. Liaw (Warrendale,
PA: TMS, 2000), p. 59.
20. W. Zhao et al.,
Metallurgical and Materials
Transactions A, 31A
(3A) (2000), p. 911.
21. P.K. Liaw et
al., Scripta
Mater., 42 (2000), p. 2000.
22. H. Wang et al.,
Metallurgical and Materials
Transactions, 31A
(4) (2000), p. 1307.
23. L. Jiang et
al., Metallurgical
and Materials Transaction A, 32
(9) (2001), p. 2279.
24. B. Yang et al.,
Mater.
Sci. and Eng., A314 (2001), p. 131.
25. L. Jiang et
al., Transactions of Nonferrous Metals Society of China, 12 (2002), p.
734.
26. H. Wang et al.,
Metallurgical and Materials
Transactions A, 33
(4) (2002), p. 1287.
27. T.M. Besmann
et al., Science,
253 (September 1991), p. 1104.
28. S. Ahuja et
al., “Thermal and Mechanical Test Methods and Behavior of Continuous-Fiber
Ceramic Composites,” ASTM STP 1309, ed. M.G. Jenkins et al. (Philadelphia,
PA: American Society for Testing and Materials, 1997).
29. H. Wang, R.B.
Dinwiddie, and P.S. Gaal, Thermal Conductivity, 23 (1996), p. 119.
30. W.J. Parker
et al., J. Applied Physics,
32 (9) (1961), p. 1679.
For more information, contact P.K. Liaw, University of Tennessee, Department of Materials Science and Engineering, 427-B Dougherty Engineering Building, Knoxville, TN 37996-2200; (865) 974-6356; fax (865) 974-4115; e-mail pliaw@utk.edu.
Direct questions about this or any other JOM page to jom@tms.org.
| Search | TMS Document Center | Subscriptions | Other Hypertext Articles | JOM | TMS OnLine |
|---|